
February 13, 2023
. 30 min readReact Router: The Beginners Guide
Use this practical guide to learn how to handle client-side routing with React Router efficiently.

Editor’s note: This React Router tutorial was last updated on February 2023 to use the React router dom v6.
A routing system provides a mechanism to navigate between different parts of an application. Naturally, React does not have a routing capability like Angular and other frameworks.
It lets us use third-party solutions like React Router, Wouter, TanStack Router, etc., to keep track of the current URL and render content based on the URL.
React: A Single-Page Application
In a conventional multi-page website, the server can return the HTML file for a requested page for the browser to create a DOM tree.
React application will load a single HTML page alongside necessary assets, including CSS and JavaScript, to render the user interface. If we recall how we build a React project, we usually render the root component (containing the app’s content) in a single div element in an index.html file.
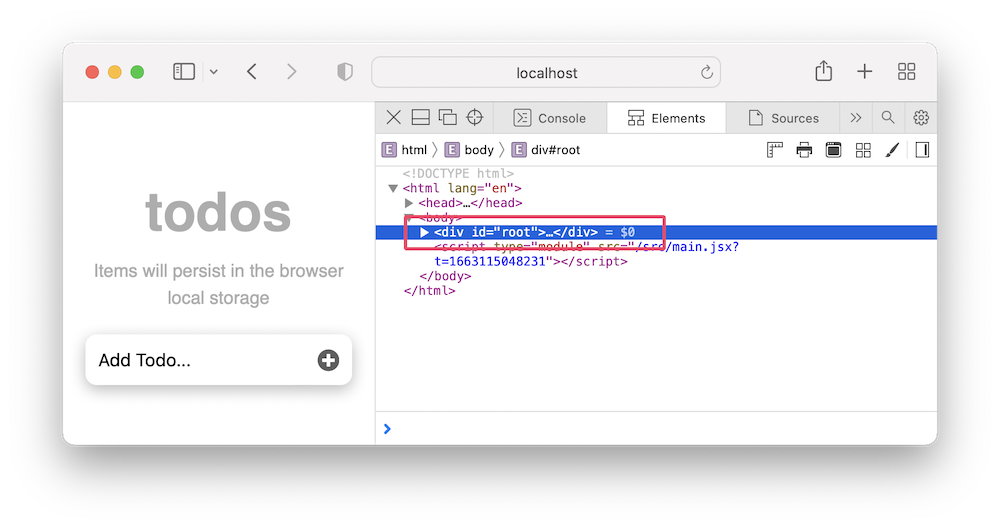
Every internal page (or route) a user will navigate is within that single div wrapper. With this architecture, we’ll discuss how to create multiple routes within this single div wrapper and navigate between them using React router.
This React tutorial is part 14 of 17 in the React for beginners series.
- Part 1 – React Tutorial: A Comprehensive Guide for Beginners
- Part 2 – React Components and Data Model
- Part 3 – React Hooks: Managing State and Side-Effects
- Part 4 – Build React Form With This Best Practice
- Part 5 – Raising and Handling Events in React
- Part 6 – React Developer Tools: Debug and optimize React apps
- Part 7 – CSS in React: Styling React Components
- Part 8 – React Todos App: Add Editing functionality
- Part 9 – Profiling: Optimizing Performance in React
- Part 10 – Using LocalStorage with React
- Part 11 – How to Use React Icons
- Part 12 – React Context API: Managing Application State
- Part 13 – Zustand Tutorial: Managing React State
- Part 15 – React Children Props: What Is It?
- Part 16 – React Toggle Button: Let’s Switch Navigation Widget
- Part 17 – Deploy React App With Vercel
If you are joining the series, we have created a todos project up to where we'll add multiple routes. We’ve managed the app’s global state using three different approaches:
- Prop drilling
- React context API
- Zustand state management library
You can clone any of the projects below to follow this lesson. Though they all bring us to the same spot, I’ll use the context API project.
# Prop drilling approach
git clone https://github.com/Ibaslogic/react-state-mgnt-starter
#or
# context API
git clone https://github.com/Ibaslogic/react-context-tutorial
#or
# Zustand
git clone https://github.com/Ibaslogic/react-zustand-tutorial
After downloading a project, navigate inside the project folder and run:
npm install
npm run dev
If all goes well, let’s dive in!
Installing React Router DOM
Let’s run the following npm command:
npm install react-router-dom@6
The react-router-dom provides all the tools and components we need to implement routing in our React app.
Connecting React App to Browser’s URL
The first process of routing with React Router is to wrap the top-level component of our app in a Router component. In the src/main.jsx entry file, we’ll import the BrowserRouter component from the library and wrap the TodoApp component with it:
// ...
import { BrowserRouter } from 'react-router-dom';

const domContainer = document.getElementById('root');
const root = ReactDOM.createRoot(domContainer);
root.render(
  <React.StrictMode>
    <BrowserRouter>
      <TodoApp />
    </BrowserRouter>
  </React.StrictMode>
);
We may also use an alias to represent the BrowserRouter like so:
// ...
import { BrowserRouter as Router } from "react-router-dom"

const domContainer = document.getElementById('root');
const root = ReactDOM.createRoot(domContainer);
root.render(
  <React.StrictMode>
    <Router>
      <TodoApp />
    </Router>
  </React.StrictMode>
);
Let’s save the file and ensure our app still works.
What is BrowserRouter?
It is a type of router that uses the HTML5 history API to keep the URL in sync with the view. With this router, we are sure of having a clean URL in the browser’s address bar like so:
http://yourapp.com/about
Another Router type is the HashRouter. While its usage is similar to the BrowserRouter, it stores the current location in the hash portion of the URL. The URL we get with this Router is not so clean like so:
http://yourapp.com/#/about
Often, we will use the BrowserRouter.
Adding Some Routes
We’ll configure the Home, About, Profile and Login routes and render them to match their URL. Let’s create an src/routes folder and add the following files: Home.jsx, About.jsx, Profile.jsx and Login.jsx.
We want the current view of our application to be the index page. So, let’s move the content of the parent component (i.e TodoApp) currently rendering the UI inside the routes/Home.jsx, so we have the following code:
import Header from '@/components/Header';
import TodosLogic from '@/components/TodosLogic';

const Home = () => {
  return (
    <div className="wrapper">
      <div className="todos">
        <Header />
        <TodosLogic />
      </div>
    </div>
  );
};
export default Home;
The components/TodoApp.jsx file should now be empty:
const TodoApp = () => {
  return <></>;
};
export default TodoApp;
We will configure React Router in this TodoApp component to know how to render different routes based on the URL path dynamically.
Before that, let’s add content to the other route files. In the routes/About.jsx file, let’s add an About component:
const About = () => {
  return <div>About content</div>;
};
export default About;
We will update the file later. Next, in the routes/Login.jsx file, let’s add the following:
const Login = () => {
  return <div>Login page</div>;
};
export default Login;
Finally, in the routes/Profile.jsx file, add the following:
const Profile = () => {
  return <div>Profile page</div>;
};
export default Profile;
Route and Routes components
React Router uses a Route component to associate a URL path with a UI element. For instance:
<Route path="/" element={<Home />} />
When a Route’s path matches the current browser URL, the associated React element will render. However, React Router uses the Routes wrapper component to find the best match for a URL location.
If we put the above definition into action, the configuration that will go in the components/TodoApp.jsx file should look like so:
import { Routes, Route } from 'react-router-dom';

import Home from '@/routes/Home';
import About from '@/routes/About';
import Login from '@/routes/Login';
import Profile from '@/routes/Profile';

const TodoApp = () => {
  return (
    <Routes>
      <Route path="/" element={<Home />} />
      <Route path="about" element={<About />} />
      <Route path="login" element={<Login />} />
      <Route path="profile" element={<Profile />} />
    </Routes>
  );
};
export default TodoApp;
Let’s save all files and manually navigate to the http://localhost:***/, /about, /profile and /login in the browser to see their respective content displayed. We will get a blank page if we enter a location that does not match a defined route.
Adding an Error page
To handle an error page, let’s create a routes/NotMatch.jsx and add the following content:
const NotMatch = () => {
  return (
    <div>
      <p>Not found!</p>
    </div>
  );
};
export default NotMatch;
Next, we will update the components/TodoApp.jsx file to include a Route that matches every instance:
// ...
import NotMatch from '@/routes/NotMatch';

const TodoApp = () => {
  return (
    <Routes>
      {/* other routes */}
      <Route path="*" element={<NotMatch />} />
    </Routes>
  );
};
export default TodoApp;
A <Route path="*"> will render an element for any location if other routes don’t match. Let’s save the file and visit a non-existing route to see an error page.
Creating a Shared Layout
A shared layout lets us structure a route to contain file content that we can share across multiple routes. For instance, creating a Navbar component will allow us to render navigation links for users to visit each route easily.
To create a shared layout, we will create a Layout component to hold a shared component. In our case, a Navbar component.
Let’s start by creating a components/Navbar.jsx and add a Navbar component code:
const Navbar = () => {
  return <div>Navigation items here</div>;
};
export default Navbar;
We will update the file later.
Next, we will create a components/Layout.jsx file and include the Navbar shared component:
import Navbar from '@/components/Navbar';
const Layout = () => {
  return (
    <div className="wrapper">
      <Navbar />
    </div>
  );
};
export default Layout;
After that, in the components/TodoApp.jsx file, we will wrap all the route elements with the Layout route:
// ...
import Layout from '@/components/Layout';
const TodoApp = () => {
  return (
    <Routes>
      <Route path="/" element={<Layout />}>
        <Route index element={<Home />} />
        <Route path="about" element={<About />} />
        <Route path="login" element={<Login />} />
        <Route path="profile" element={<Profile />} />
        <Route path="*" element={<NotMatch />} />
      </Route>
    </Routes>
  );
};
export default TodoApp;
In the code, we nested all the route elements as children inside a Layout route. Notice how we moved the path from the Home route to the parent route, Layout. This is because <Route path>s are relative - i.e. they build on the parent route's path. Since the parent path is "/", the <About /> component will match the path "/about", and so on.
However, if the parent route matches precisely, it will render a child index route. If we save all files and revisit the application, we will only see the content of the Navbar.
Before we move on, notice how we included a wrapper class name in the Layout component. Let’s remove the class name with the div container from the Home component like so:
const Home = () => {
  return (
    // <div className="wrapper"> remove the div
    <div className="todos">
      <Header />
      <TodosLogic />
    </div>
    // </div>
  );
};
export default Home;
The <Outlet> Component
Whenever we create a nested configuration as we’ve done in the TodoApp component, we will use the Outlet in the parent route, i.e. Layout, to render their child route’s elements.
Let’s import the Outlet in the components/Layout.jsx file and render the component below the <Navbar />:
import { Outlet } from 'react-router-dom';
import Navbar from '@/components/Navbar';
const Layout = () => {
  return (
    <div className="wrapper">
      <Navbar />
      <Outlet />
    </div>
  );
};
export default Layout;
If we save the file, we should see the route content alongside the navigation content.
Adding Navigation Links
In the Navbar component, we’ll start by adding an array of objects containing all the links like so:
const links = [
  { path: '/', text: 'Home' },
  { path: 'about', text: 'About' },
  { path: 'profile', text: 'Profile' },
  { path: 'login', text: 'Login' },
];
const Navbar = () => {
  return (
    // ...
  );
};
export default Navbar;
Next, we will loop through the links array and render each item in the return statement:
return (
  <nav className="navbar">
    <ul>
      {links.map((link) => {
        return (
          <li key={link.text}>
            <a href={link.path}>{link.text}</a>
          </li>
        );
      })}
    </ul>
  </nav>
);
If we save and see our application, we should see the nav items rendered.
In the code, we used HTML <a> tag to link internal pages of the app. This link tag will cause an entire page to reload when we click to navigate. However, React Router provides <Link> and <NavLink> components for smooth navigation.
Link and NavLink Component
To navigate a different route, we will use a Link or NavLink component from React Router. We use NavLink when we are concerned about an “active” route. It does this by adding an active class to the active route.
We can also add a custom class or perform inline styling with a function we can pass to the className and style attributes.
In the Navbar component, we’ll import NavLink and then replace the <a> tag with the NavLink, so we have the following:
import { NavLink } from "react-router-dom";

const links = [
  // ...
];
const Navbar = () => {
  return (
    <nav className="navbar">
      <ul>
        {links.map((link) => {
          return (
            <li key={link.text}>
              <NavLink to={link.path}>{link.text}</NavLink>
            </li>
          );
        })}
      </ul>
    </nav>
  );
};
export default Navbar;
The NavLink component takes a to attribute pointing to the resource it's linking. It is equivalent to the href attribute in the <a> tag. If we save the file and see the application, we should be able to navigate routes without a page reload.
If we inspect the items in the DevTools, we should see an active class applied to the active route.
Creating a Custom Class and Inline Styling
To create a custom class, we will pass a function to className like so:
<NavLink
  to={link.path}
  className={({ isActive }) =>
    isActive ? 'active__class' : undefined
  }
>
  {link.text}
</NavLink>
The code applies the active__class class name to the navigation item when the current route is active. For inline styling with style attribute, the code will look like so:
<NavLink
  to={link.path}
  style={({ isActive }) => ({
    color: isActive ? 'red' : undefined,
  })}
>
  {link.text}
</NavLink>
In our project, we’ll go with the default active class. So, update the NavLink to the following:
<NavLink to={link.path}>{link.text}</NavLink>
After that, we will open the src/styles/app.css file to style the active link:
a {
  color: #333;
  text-decoration: none;
}
/* Active route */
.active {
  color: #005bb3;
}
Save the file and ensure the project works as expected.
Dynamic Nested Routing
Earlier, we configured a nested route by nesting Route under a parent Layout route in the TodoApp component. Using the same approach, we will create sub-routes for the About page.
If we visit the About page of the final project, we will see two links that further points to a deeply nested route: /about/about-app and /about/about-developer.
To create these nested routes, we can position their <Route path> under a parent About route:
<Route path="about" element={<About />}>
  <Route path="about-app" element={<AboutPage1 />} />
  <Route path="about-developer" element={<AboutPage2 />} />
</Route>
Remember, the children <Route path> in a nested route will build on the parent route's path. That is, the path="about-app" in the children will build on the parent, path="about" to form about/about-app, which will then be built on its parent, path="/" to form an absolute path: http://localhost:***/about/about-app.
With dynamic nested routing, we don’t need to include multiple children routes. We can dynamically generate the content of the nested route elements with one file.
The following code implements a dynamic nested routing for the same About page:
<Route path="about" element={<About />}>
  <Route path=":slug" element={<SinglePage />} />
</Route>
We’ve replaced the children elements with a single route containing a URL param called :slug. With this nested route, the path that will render the SinglePage component is the about/:slug. Where :slug lets us match any routes as long as the pattern is the same.
For instance, about/:slug will match both the about/about-app and about/about-developer routes.
If we now use this pattern in the components/TodoApp.jsx file, we will replace the About route with the dynamic nested routes:
// ...
import SinglePage from '@/routes/SinglePage';

const TodoApp = () => {
  return (
    <Routes>
      <Route path="/" element={<Layout />}>
        <Route index element={<Home />} />
        <Route path="about" element={<About />}>
          <Route path=":slug" element={<SinglePage />} />
        </Route>
        <Route path="login" element={<Login />} />
        <Route path="profile" element={<Profile />} />
        <Route path="*" element={<NotMatch />} />
      </Route>
    </Routes>
  );
};
export default TodoApp;
Notice that we imported the SinglePage component that will render the dynamic route. We don’t have the file yet, so let’s create a routes/SinglePage.jsx file and add the following code:
const SinglePage = () => {
  return (
    <div className="main_content">
      single page content
    </div>
  );
};
export default SinglePage;
Rendering Dynamic Content With Outlet
Like we have done earlier, whenever we have a children route, we will use the Outlet in the parent route (in this case, About) to render the children (in our case, the single page content).
Let’s import Outlet and NavLink in the routes/About.jsx file and render the component, so we have:
import { NavLink, Outlet } from 'react-router-dom';
const About = () => {
  return (
    <>
      <h1>About page.</h1>
      <div className="about">
        <ul className="about_list">
          <li>
            <NavLink to="about-app">About app</NavLink>
          </li>
          <li>
            <NavLink to="about-developer">About developer</NavLink>
          </li>
        </ul>
        <Outlet />
      </div>
    </>
  );
};
export default About;
Because the <Route path="about"> implements nested routing, any path in the About component that starts without a preceding forward slash / like to="about-app" will build on the about/ to generate about/about-app route. If we add a forward slash / like to="/about-app", it will be relative to the root like http://localhost:***/about-app.
Remember that the about/:slug will render a SinglePage component. So, any matching path like about/about-app will render the SinglePage.
If we save the files, the nested links in the about page should render the content of the SinglePage component.
Reading URL Params With useParams Hook
We want to dynamically display the content on a single page based on the params. Inside the SinglePage, we have access to the dynamic params from the current URL.
We will use a Hook called useParams from the React Router to access it. In the routes/SinglePage.jsx file, let’s import the useParams Hook and log it in the console:
import { useParams } from 'react-router-dom';
const SinglePage = () => {
  console.log(useParams());
  return <div className="main_content">single page content</div>;
};
export default SinglePage;
If we save the file and navigate to the single page while the console is opened, we should see the page slug right there. The useParams Hook returns an object containing a slug key with the dynamic URL path as the value. The key is called slug because we named the params :slug.
Displaying Dynamic Content
In the routes/SinglePage.jsx file, we will start by adding the following data outside the SinglePage function component:
const aboutData = [
  {
    slug: 'about-app',
    title: 'About the app',
    description:
      "This application lets us add to-dos, edit, and delete items. Log in to see the delete feature. It also persists to-dos in the browser's local storage for a subsequent visit.",
  },
  {
    slug: 'about-developer',
    title: 'About the developer',
    description:
      'Ibas Majid founded ibaslogic.com to experiment with new web features and write actionable guides. Follow Ibas on Twitter @ibaslogic to learn modern web development.',
  },
];
After that, let’s render the data object dynamically. Still in the routes/SinglePage.jsx file, update the component, so we have the following:
import { useParams } from 'react-router-dom';

const aboutData = [
  // ...
];
const SinglePage = () => {
  const { slug } = useParams();
  const aboutContent = aboutData.find((item) => item.slug === slug);
  const { title, description } = aboutContent;
  return (
    <div className="main_content">
      <h2>{title}</h2>
      <p>{description}</p>
    </div>
  );
};
export default SinglePage;
We started by grabbing the slug from the useParams() Hook and then using the JavaScript find() method on the data to return an array object whose slug matches that of the current page. We’ve used object destructuring to grab the title and description we rendered in the JSX.
If we save the file and visit the frontend, we should be able to view the content of the nested route on the About page:

React Router Authentication
In the final project, notice the Profile route is not accessible from users that are not logged in. We will set up the functionality that will conditionally render the Profile route based on the user's authentication status.
For simplicity's sake, we will not be doing any complicated authentication like Token-based authentication or server or password-based authentication to validate users' input. We will only check if a user exists to provide full access to the app’s content. If not, we will redirect the user to the login route.
Because the user’s input can be used in different parts of the application, we will also create a context store to share the global data in the component tree.
Adding a Login Form
Let’s create a form to take the user’s input. In the routes/Login.jsx, create a controlled form input so we have the following:
import { useState } from 'react';
import styles from '@/styles/Login.module.css';

const Login = () => {
  const [username, setUsername] = useState('');
  const handleSubmit = (e) => {
    e.preventDefault();
    if (!username) return;
    console.log(username);
  };
  return (
    <div>
      <h1>Login</h1>
      <div className={styles.formWrapper}>
        <form className={styles.form} onSubmit={handleSubmit}>
          <input
            type="text"
            placeholder="username"
            value={username}
            onChange={(e) => setUsername(e.target.value)}
          />
          <button>Login</button>
        </form>
      </div>
    </div>
  );
};
export default Login;
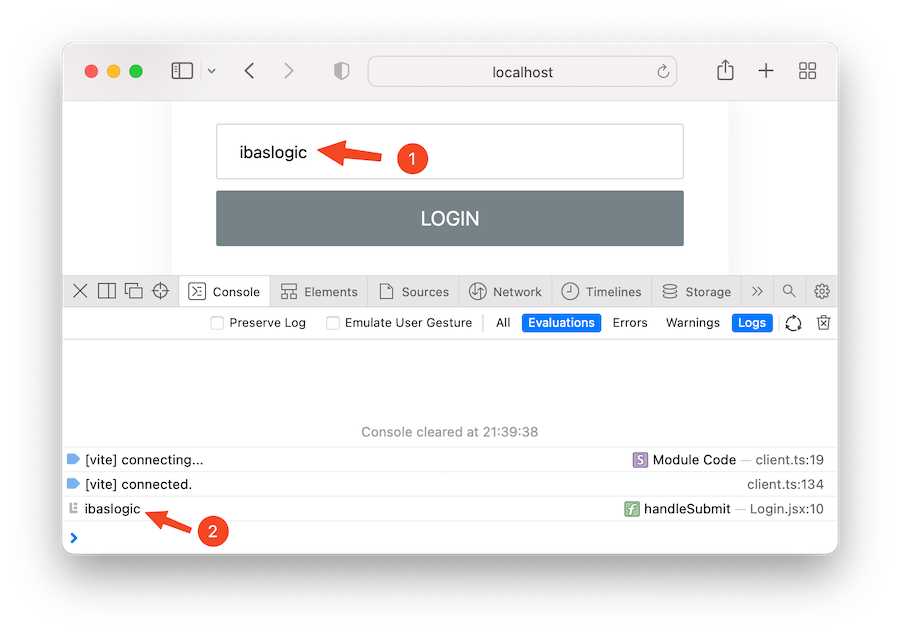
The code is self-explanatory. If you need a refresher, visit the React form input lesson. Notice we also implemented a CSS module. Let’s create a styles/Login.module.css file, copy the styles from the project repository, and paste them into the newly created file.
If we save the file, we should have a form input like the one below. The user’s input is shown in the console after we click the login button:
Creating an AuthContext Store
As we mentioned, we'll use the user’s input in different components. We will take the data from the Login component and pass it to a context store that lets us broadcast it.
Let’s create an src/context/AuthContext.jsx file and add the following code:
import { useState, useContext, createContext } from 'react';

const AuthContext = createContext(null);
export const AuthProvider = ({ children }) => {
  const [user, setUser] = useState('');
  const login = (user) => setUser(user);
  const logout = () => setUser(null);
  return (
    <AuthContext.Provider value={{ user, login, logout }}>
      {children}
    </AuthContext.Provider>
  );
};
export const useAuthContext = () => useContext(AuthContext);
We created a context store that helps manage the user’s inputs and the login and logout functionalities. The login function expects the user’s input from the login form to update the global user state. We will need this function in the Login component to take the current username.
The logout function only resets the user state and will be used in any component that includes a logout button.
Now, we’ll wrap the consuming components with the AuthProvider so they can access the provider value.
Need to refresh the React context API? Read the context lesson here.
Because we will need the context data in the Navbar component, let’s ensure AuthProvider wraps it. In the components/Layout.jsx file, let’s wrap the components in the JSX with AuthProvider:
import { Outlet } from 'react-router-dom';
import Navbar from '@/components/Navbar';
import { AuthProvider } from '@/context/AuthContext';
const Layout = () => {
  return (
    <div className="wrapper">
      <AuthProvider>
        <Navbar />
        <Outlet />
      </AuthProvider>
    </div>
  );
};
export default Layout;
Save all files and ensure the project still works.
Updating Global User’s State With the User’s Submission
In the Login component, we will access the login function from the context store and pass the current form input state.
// ...
import { useAuthContext } from '@/context/AuthContext';
const Login = () => {
  const [username, setUsername] = useState('');
  const { login } = useAuthContext();
  const handleSubmit = (e) => {
    e.preventDefault();
    if (!username) return;
    login(username);
    setUsername('');
  };
  return (
    // ...
  );
};
export default Login;
Now, the current username is available globally, and other components can consume it.
Using Context State in the Profile Component
We want to display the user’s username in the profile route. So let’s consume it from the context store and render it in the Profile component:
import { useAuthContext } from '@/context/AuthContext';
import styles from '@/styles/Profile.module.css';

const Profile = () => {
  const { user } = useAuthContext();
  return (
    <div>
      <h1>profile.</h1>
      <div className={styles.profile}>
        <h2>Hello, {user}</h2>
      </div>
    </div>
  );
};
export default Profile;
Before we save the file, let’s create a styles/Profile.module.css and add the following CSS:
.profile {
  max-width: 1000px;
  margin: 0 auto;
}
Save all the files. Now, let’s add a username via the form and navigate to the profile route. We should see the username displayed.
Adding Logout Button
We have the logout logic already in the context store. We’ll now consume the functionality inside the Navbar component where we want to render the button.
// ...
import { useAuthContext } from '@/context/AuthContext';
const links = [
  // ...
];
const Navbar = () => {
  const { user, logout } = useAuthContext();
  const handleLogout = () => {
    logout();
  };
  return (
    <>
      <nav className="navbar">{/* ... */}</nav>
      {user && (
        <div className="logout">
          <p>{user}</p>
          {<button onClick={handleLogout}>Logout</button>}
        </div>
      )}
    </>
  );
};
export default Navbar;
Be aware that we have introduced fragment
<></>to wrap the returned JSX.
In the JSX, we check if the user exists and only render the username and a logout button. Let’s test our application and ensure the logout functionality works.
Hiding Login Menu Link When User is Logged In
We will use the global user state to render the login menu link conditionally. In the Navbar component, find the following JSX:
<ul>
  {links.map((link) => {
    return (
      <li key={link.text}>
        <NavLink to={link.path}>{link.text}</NavLink>
      </li>
    );
  })}
</ul>
And replace with the following:
<ul>
  {links.map((link) => {
    return (
      <React.Fragment key={link.text}>
        {link.path === 'login' ? (
          !user && (
            <li>
              <NavLink to={link.path}>{link.text}</NavLink>
            </li>
          )
        ) : (
          <li>
            <NavLink to={link.path}>{link.text}</NavLink>
          </li>
        )}
      </React.Fragment>
    );
  })}
</ul>
With the code, we checked if the path of the current iteration is login, then we only want it displayed if a user is not logged in. We used React.Fragment because we don’t want an extra element comes in between <ul> and li.
To add a key to a fragment, we must use
React.Fragmentand not the shortcut equivalent,<></>.
Remember to import React at the top of the file because it is in the scope via React.Fragment:
import React from 'react';
If we save the file and test our project, we should only see the Login menu link if logged out.
Redirect With useNavigate Hook and <Navigate> Component
In our login route, we want to navigate away from the login screen to an intended route after a successful login.
React Router offers a useNavigate Hook to help us navigate programmatically to another route. This Hook returns a function that takes a required first argument and an optional object as the second argument. The syntax looks like so:
navigate(to, { state: {}, replace: false });
Using useNavigate Hook
In the routes/Login.jsx file, we will import the useNavigate Hook and pass the path we want to navigate to as an argument:
import { useNavigate } from 'react-router-dom';
// ...
const Login = () => {
  // ...
  const navigate = useNavigate();
  const handleSubmit = (e) => {
    // ...
    navigate('/');
  };
  return (
    // ...
  );
};
export default Login;
In the submit handler, we have passed the index path as an argument. If we save the file and test our project, we should redirect to the home page after a successful login.
We can also pass a number as an argument like so:
navigate(-1) // to go to a previously visited route.
navigate(-2) // to go back to two pages in browser history.
The **replace** option
With the default value, if we navigate from the login screen to the path we specified (i.e. index route), that path will be pushed into the history stack. The implication is that if we click the browser’s back button, we will get back to the login screen (while we are logged in).
To prevent that, we will pass replace: true as the second argument:
const handleSubmit = (e) => {
  // ...
  navigate('/', { replace: true });
};
This ensures React Router replaces the login route in the navigation history with the route before that. We will further explore the useNavigate Hook later in this lesson.
Redirect to the login route after we logout
Using the useNavigate Hook, let’s redirect to the login route whenever we click the logout button. Open the Navbar component and ensure the navigate takes /login path as an argument in the function that handles the logout:
import {
  // ...
  useNavigate
} from 'react-router-dom';
// ...
const Navbar = () => {
  // ...
  const navigate = useNavigate();
  const handleLogout = () => {
    logout();
    navigate('/login');
  };
  return (
    // ...
  );
};
export default Navbar;
Let’s save the file and ensure we can redirect to the login route when we log out.
<Navigate> Component
The <Navigate> component is a wrapper around the useNavigate Hook. Being a component, it can programmatically change the current route when it is rendered. It takes all the same argument of useNavigate Hook as props:
<Navigate to="/login" state={{}} replace />;
We will explore the <Navigate> component in the coming sections.
Protected Routes With React Router
To make specific routes inaccessible for users that are not authenticated, we will protect the route. With React Router, we can create a custom component to hold the functionalities. Let’s create a components/ProtectedRoute.jsx and add the following code:
import { Navigate } from 'react-router-dom';
import { useAuthContext } from '@/context/AuthContext';

const ProtectedRoute = ({ children }) => {
  const { user } = useAuthContext();
  if (!user) {
    return <Navigate to="/login" />;
  }
  return children;
};
export default ProtectedRoute;
In the component, we checked the user’s login status to render children prop or redirect the user to a login page.
We didn’t use the
useNavigateHook in the render because the rules of React Hooks also applied to it. That was why we reached out to itsNavigatecounterpart.
Now, any descendant component of the ProtectedRoute will become the children. Since we want to protect the Profile route, we will wrap the route’s element with ProtectedRoute.
Let’s import the ProtectedRoute in the TodoApp parent component file and wrap the <Profile /> element with it, so we have the following:
// ...
import ProtectedRoute from '@/components/ProtectedRoute';

const TodoApp = () => {
  return (
    <Routes>
      <Route path="/" element={<Layout />}>
        {/* ... */}
        <Route
          path="profile"
          element={
            <ProtectedRoute>
              <Profile />
            </ProtectedRoute>
          }
        />
        {/* ... */}
      </Route>
    </Routes>
  );
};
export default TodoApp;
If we save all files and try to access the Profile route, we will be redirected to the login page if we are not logged in.
Hiding Profile Menu Link When User is Logged out
Similar to hiding the login menu link earlier, we will use the global user state to render the profile menu link conditionally. In the Navbar component, we will modify the condition in the <ul> to accommodate an additional else statement.
The nav should now look like so:
<nav className="navbar">
  <ul>
    {links.map((link) => {
      return (
        <React.Fragment key={link.text}>
          {link.path === 'login' ? (
            !user && (
              <li>
                <NavLink to={link.path}>{link.text}</NavLink>
              </li>
            )
          ) : link.path === 'profile' ? (
            user && (
              <li>
                <NavLink to={link.path}>
                  {link.text}
                </NavLink>
              </li>
            )
          ) : (
            <li>
              <NavLink to={link.path}>{link.text}</NavLink>
            </li>
          )}
        </React.Fragment>
      );
    })}
  </ul>
</nav>
In addition to the earlier condition, we now check if the path of the current iteration is profile. Then we only want it to display if a user is logged in.
If we save the file and test our project, we should only see the profile menu link if logged in.
Using useLocation Hook
If we log out and then try to access the protected profile route from the address bar, we’ll be redirected to the login screen. That is expected! However, after a successful login, we should see the screen that we intended to visit, i.e. the profile route, and not the index route.
Remember, we manually specified the index route as the path to redirect to:
const handleSubmit = (e) => {
  // ...
  navigate('/', { replace: true });
};
Instead of the manual redirect to the index page, we will use the useLocation Hook to track the URL and know the route users intended to access before they land on the login screen.
In the routes/Login.jsx file, let’s import and use the useLocation Hook:
import {
  useLocation,
  // ...
} from 'react-router-dom';
// ...
const Login = () => {
  // ...
  const location = useLocation();
  console.log(location);
  // ...
  return (
    ...
  );
};
export default Login;
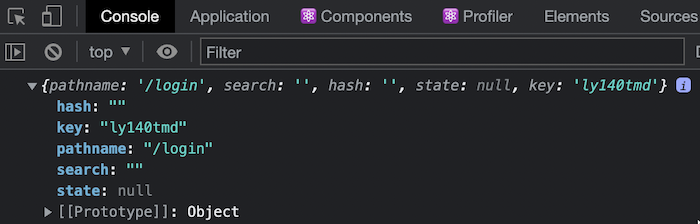
If we save the file and reload the login route in the browser, we should see the location object of the current route:
Using the same approach in the ProtectedRoute component, we can get the current location when we hit a protected route.
import { Navigate, useLocation } from 'react-router-dom';
import { useAuthContext } from '@/context/AuthContext';

const ProtectedRoute = ({ children }) => {
  const { user } = useAuthContext();
  const location = useLocation();
  console.log(location);
  if (!user) {
    return <Navigate to="/login" />;
  }
  return children;
};
export default ProtectedRoute;
Referencing the screenshot above, we expect the location object here to include **pathname**``: "/profile" that we can access via location.pathname.
Next, we need to pass the pathname while redirecting to the login screen to keep track of the user's intended route. We can do that via the state option of the <Navigate /> element.
const ProtectedRoute = ({ children }) => {
  //  ...
  if (!user) {
    return (
      <Navigate
        to="/login"
        state={{ pathname: location.pathname }}
        replace
      />
    );
  }
  return children;
};
export default ProtectedRoute;
We also added replace option to prevent going back to the login screen if we click the browser back button.
Let’s go back to the Login component to access the pathname, so we can use it as the route to redirect to after a successful login.
const Login = () => {
  // ...
  const navigate = useNavigate();
  const location = useLocation();
  const from = location.state?.pathname || '/';
  const handleSubmit = (e) => {
    // ...
    navigate(from, { replace: true });
  };
  return (
    // ...
  );
};
export default Login;
We’ve checked if we hit the path to a protected route, so we can redirect to the route after we log in. Otherwise, we redirect to the index page.
Limiting Access to Features
We will hide the edit button for users who are not logged in. This is straightforward!
In the components/TodoItem.jsx file, let’s consume the user state from the AuthContext store and use it to conditionality render the edit button:
// ...
import { useAuthContext } from '@/context/AuthContext';
const TodoItem = ({ itemProp }) => {
  const { user } = useAuthContext();
  // ...
  return (
    <li className={styles.item}>
      {/* ... */}
        {user && (
          <button onClick={handleEditing}>
            <AiFillEdit
              style={{ color: '#5e5e5e', fontSize: '16px' }}
            />
          </button>
        )}
        {/* ... */}
    </li>
  );
};
export default TodoItem;
Notify Users About the Edit Option
In the final project, you’ll see the text “Log in to edit to-dos” in the navigation panel that tells users about the edit functionality. To implement that in our project, let’s open the Navbar component and add the option just before the close of the </ul> element:
<nav className="navbar">
  <ul>
    {/* ... */}
    {!user && (
      <li className="log-in">
        <span>Log in to edit to-dos</span>
      </li>
    )}
  </ul>
</nav>
Save the file and ensure you see the text when you log out.
Persist the User State in the Browser storage
To ensure the user’s login info persist even after we close the browser, we’ll save the user state in the local storage.
Remember how we persist the todos state data in the TodosContext store. If we replicate the process in the AuthContext store, the AuthProvider component should now include the logic to store and get the user state in and out of the storage:
import {
  // ...
  useEffect,
} from 'react';
// ...
export const AuthProvider = ({ children }) => {
  const [user, setUser] = useState(getUsername());
  function getUsername() {
    // getting stored state
    const temp = localStorage.getItem('username');
    const savedUsername = JSON.parse(temp);
    return savedUsername || '';
  }
  useEffect(() => {
    // storing user state
    const temp = JSON.stringify(user);
    localStorage.setItem('username', temp);
  }, [user]);
  // ...
  return (
    // ...
  );
};
Save the file and ensure the login data persist after the page reloads. Cool! We are done with routing.
Let’s add a bit of CSS to style the About route. In the styles/app.css, let’s add the following CSS rules at the bottom:
/*==========================
About route
========================*/
.about {
  max-width: 1000px;
  margin: 0 auto;
}
.about_list {
  list-style: none;
}
.about_list a {
  padding: 20px 0;
  display: inline-block;
  text-decoration: none;
  font-weight: bold;
}
.about_list a:hover {
  color: #005bb3;
}
.main_content {
  max-width: 650px;
}
.main_content h2 {
  margin-bottom: 15px;
  line-height: 30px;
  font-size: 26px;
}
.main_content p {
  line-height: 25px;
}
/* Media Queries */
@media screen and (min-width: 480px) {
  div.wrapper h1 {
    font-size: 6rem;
  }
  .about {
    display: grid;
    grid-template-columns: 200px minmax(0, 1fr);
  }
}
Save all files and test your project! The app functionality should work as expected! In the next lesson, we will talk about another concept of React called composition and explore in detail a special prop called children.
Next part: React Children Props
continue