
February 13, 2023
. 8 min readReact Context API: Managing Application State
Get started with the React Context API and quickly share state and props throughout your application.

The React context API provides another way to manage the application state. Up to this part in the series, we have used the prop drilling approach to manually pass data from the parent component down to the children and grandchildren components.
Prop drilling is acceptable if it doesn’t cause pain, like drilling into a deeply nested component. If it does, and your application is extensive, you can reach out for context API or a state-management solution library like a Redux toolkit, Zustand, Jotai, or Recoil.
This lesson will discuss managing the global state with the React context API. A follow-up lesson will cover state management using the Zustand library for a more performant implementation.
This React tutorial is part 12 of 17 in the React for beginners series.
- Part 1 – React Tutorial: A Comprehensive Guide for Beginners
- Part 2 – React Components and Data Model
- Part 3 – React Hooks: Managing State and Side-Effects
- Part 4 – Build React Form With This Best Practice
- Part 5 – Raising and Handling Events in React
- Part 6 – React Developer Tools: Debug and optimize React apps
- Part 7 – CSS in React: Styling React Components
- Part 8 – React Todos App: Add Editing functionality
- Part 9 – Profiling: Optimizing Performance in React
- Part 10 – Using LocalStorage with React
- Part 11 – How to Use React Icons
- Part 13 – Zustand Tutorial: Managing React State
- Part 14 – React Router: The Beginners Guide
- Part 15 – React children props: What Is It?
- Part 16 – React Toggle Button: Let’s Switch Navigation Widget
- Part 17 – Deploy React App With Vercel
What is React Context API?
The context API allows components to consume data from a central place of truth (which we can call a store) without manually passing props down the component tree. Any component that needs access to global state data will grab it directly rather than with the help of an intermediate component.
While this approach can be simple, it can also become a nightmare if not handled with care.
When Not to Use the Context API
We should avoid the context API if we only want to keep away from prop drilling if that is feasible! Context API is designed for genuinely global states that don't change much but are used throughout the application. For instance, UI theme, users login status, locale preference etc.
Using the Context API
Whenever we reach out for context, we should note the following:
- Avoid putting all state data in a global context. If a state can stay local in a component, keep it local.
- Only put a truly global state or handler in the context store.
- Every component that consumes the context data will update and re-render. To reduce the performance bottleneck, ensure you follow steps 1 and 2.
Getting the Starter Project Files
Our React series project uses the prop drilling approach to transmit the global state and handler. That is fine in a simple application where prop drilling is not a pain. However, we will convert the prop drilling approach to context API to showcase how React context API works.
If you are following the React series, you should be ready to start, so move to this section. Otherwise, you can clone the current status of the todos project using the following command:
git clone https://github.com/Ibaslogic/react-state-mgnt-starter
Then, move into the project folder and generate the node_modules folder:
cd react-state-mgnt-starter
npm install
Finally, run the project:
npm run dev
We have created the React project using the Vite build tool. The frontend should look like so:
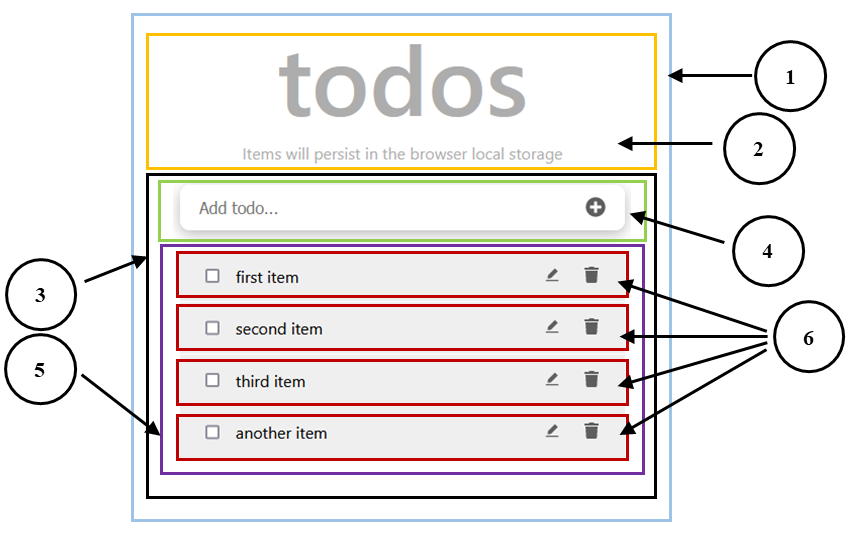
The labels correspond to the following component's name:
- TodoApp: the parent or root component. It holds two direct child components.
- Header: display the todos heading text.
- TodosLogic: holds the application logic. It includes two direct child components.
- InputTodo: will take the user’s input.
- TodosList: serves as a container for the todos items.
- TodoItem: renders the individual todos item.
If we explore the project tree, the focus will be on the components folder:
project dir
    ...
    ├── src
    │    ├── components
    |    |     ...
    │    │      ├── InputTodo.jsx
    │    │      ├── TodoItem.jsx
    │    │      ├── TodosList.jsx
    │    │      └── TodosLogic.jsx
The components/TodosLogic.jsx file currently holds the global state data, and it distributes the data to children components that need it via props drilling. The TodosList component receives props it does not need and only serves as an intermediary to pass them further down the components tree. With context API, we will bypass this intermediary component and get data into the lower component.
Setting Up the Context Store
We will put the global data in a context store and exposes them for components to consume. Let’s create a context/TodosContext.jsx file in the src folder and add the following starting code:
import { createContext } from 'react';

const TodosContext = createContext(null);

export const TodosProvider = ({ children }) => {
  return (
    <TodosContext.Provider value={'todos data'}>
      {children}
    </TodosContext.Provider>
  );
};
export { TodosContext };
We started by importing the createContext API from react and passing a default context value as an argument. This API returns a context object that we assigned to TodosContext.
The context object exposes a Provider component that allows consuming components to have access to consume the context data. Any descendant components of this provider will have access to the context data.
The children prop used in the TodosProvider component will be the JSX/components that we pass between the <TodosProvider></TodosProvider> tags. We will cover the children's prop in detail later in the series.
All components that will be a descendant of the <TodosProvider></TodosProvider> will have access to whatever we assign to the provider’s value prop.
Whenever the value prop changes, all components that consume the data will re-render. That is fine if we pass a primitive value like string, number or Boolean. However, passing objects or arrays might cause unnecessary re-render in the tree because when a part of that object changes, all consumer components will re-render even if what changes don’t affect them.
For that reason, we must rigorously follow the steps mentioned above.
Wrapping Consuming Components With the Context Provider
As mentioned earlier, we must wrap the app’s components with the context Provider before they can access the context data. We can wrap the root component with the TodosProvider, which should be fine. However, it is a good practice to wrap the components that require access to the context. This practice also makes it habitual to create multiple instances of a context.
Let’s open the components/TodosLogic.jsx file and wrap the components with the provider like so:
// ...
import { TodosProvider } from '@/context/TodosContext';
const TodosLogic = () => {
  // ...
  return (
    <TodosProvider>
      <InputTodo addTodoItem={addTodoItem} />
      <TodosList
        todosProps={todos}
        handleChange={handleChange}
        delTodo={delTodo}
        setUpdate={setUpdate}
      />
    </TodosProvider>
  );
};
export default TodosLogic;
The
InputTodoandTodosListand their descendants (likeTodoItem) are now thechildrenprops and are the only components that can access the context data. Other components like theHeaderandTodosLogicthat are not wrapped in the provider will not have access to the data (they don’t need the context data).
Accessing the Context Data With the useContext Hook
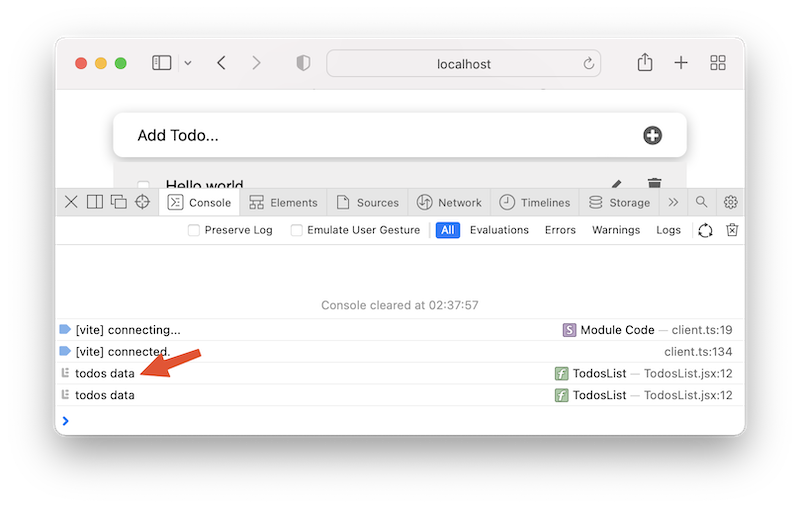
To consume the context data, let’s open components/TodosList.jsx file, which is one of the consuming components. Then, import useContext Hook and the TodosContext object that we exported from the store:
import { useContext } from 'react';
import { TodosContext } from '@/context/TodosContext';
The useContext Hook will let us read the context data. We will call it above the return statement and pass the context object as an argument:
const value = useContext(TodosContext);
console.log(value);
If we save the file and open the DevTools console, we will see the context data that we assigned to the value prop:
Instead of passing a simple string to the value prop as seen above, we will pass an object containing the todos global state and the handler functions.
Before we move the data to the context store, let’s refactor our code a bit.
Exporting the useContext From the Context Store
Every consuming component needs the useContext Hook and the TodosContext object from the context store. While we can manually import them as we have done above, it is wise to export a function that returns the equivalent we can now call in every consuming component.
Let’s update the context store to include the useTodosContext function export:
import { createContext, useContext } from 'react';

const TodosContext = createContext(null);

export const TodosProvider = ({ children }) => {
  return (
    <TodosContext.Provider value={'todos data'}>
      {children}
    </TodosContext.Provider>
  );
};
export const useTodosContext = () => useContext(TodosContext);
Now, we can use the useTodosContext function to access the context data:
// ...
import { useTodosContext } from '@/context/TodosContext';
const TodosList = () => {
  const value = useTodosContext();
  console.log(value);
  return (
    // ...
  );
};
export default TodosList;
If we save the file, we should still see the string assigned to the value prop in the browser console.
Moving Todos Global Data to the Context Store
Let’s move the todos state and the handler functions from the TodosLogic component and paste them above the return statement in the context/TodosContext.jsx file. Ensure you move the uuid, useState and useEffect imports as well.
Next, let’s update the value prop in the Provider component to include the todos data and the handlers, so other components in the tree can access them.
import {
  useState,
  useEffect,
  createContext,
  useContext,
} from 'react';

import { v4 as uuidv4 } from 'uuid';

const TodosContext = createContext(null);

export const TodosProvider = ({ children }) => {
  // ...
  return (
    <TodosContext.Provider
      value={{
        todos,
        handleChange,
        delTodo,
        addTodoItem,
        setUpdate,
      }}
    >
      {children}
    </TodosContext.Provider>
  );
};
export const useTodosContext = () => useContext(TodosContext);
Now, we can remove all the props applied on the components tags in the TodosLogic JSX, so we now have the following:
const TodosLogic = () => {
  return (
    <TodosProvider>
      <InputTodo />
      <TodosList />
    </TodosProvider>
  );
};
export default TodosLogic;
As we can see, we will no longer pass props around to get data down sub-components. They now have access to consume the data directly from the context store.
If we save the files, we will see a broken page. This is happening because the TodosList component still references a prop from the parent to get the todos data. Since the todos is now available in the context store, let’s consume the data directly.
Consuming Global Data from the Store
In the components/TodosList.jsx file, let’s import the useTodosContext function from the context store and destructure the provider value to grab the todos state we will now map through in the JSX. The file should look like so:
import TodoItem from '@/components/TodoItem';
import { useTodosContext } from '@/context/TodosContext';
const TodosList = () => {
  const { todos } = useTodosContext();
  return (
    <ul>
      {todos.map((todo) => (
        <TodoItem key={todo.id} itemProp={todo} />
      ))}
    </ul>
  );
};
export default TodosList;
Notice we removed all the props that pass global data around. Again, the data is ready to consume by any descendant components. If we save the file, the application should now render.
Though, some of the functionalities are still broken. We need to consume the context data from the TodoItem and InputTodo components.
Using Context Data in the TodoItem Component
As expected, we will import useTodosContext from the context store and grab the handlers by destructuring the returned value:
import { useState, useRef } from 'react';
import { useTodosContext } from '@/context/TodosContext';
// ...
const TodoItem = ({ itemProp }) => {
  const { handleChange, delTodo, setUpdate } = useTodosContext();
  // ...
  return (
    // ...
  );
};
export default TodoItem;
Notice we removed the props that pass global data and instead grab them from the context object.
Using Context Data in the InputTodo Component
Let’s ensure the functionality in the InputTodo component also works. Open the components/InputTodo.jsx file and import useTodosContext from the context store. After that, grab the addTodoItem handler from the returned object rather than via the component’s prop:
// ...
import { useTodosContext } from '@/context/TodosContext';
const InputTodo = () => {
  const { addTodoItem } = useTodosContext();
  // ...
  return (
    // ...
  );
};
export default InputTodo;
Let’s save the file and ensure the application works as expected.
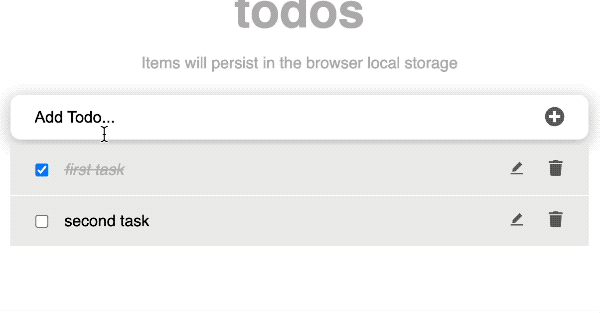
Performance Issues With Context API
As we mentioned, every component that consumes the context data will re-render each time the value prop (or part of its object) changes in the context store.
In the profiled GIF above, notice that clicking on the checkbox and the delete button re-renders all the components consuming the context data, including the text input, even while the input has nothing to do with the update. That is the danger of passing objects to the context value against a simple string or number. The problem happens due to referential identity. For instance, whenever the provider re-renders, the object assigned to the value prop is constantly re-created, which triggers the consuming components to re-render.
Notice that when we write text in the input field, only the input component re-renders on every keystroke. That is fine and expected! The onChange handler and the state responsible for these changes are kept local, not part of the context. If we had moved the onChange handler and the local state to the context value prop, all the components consuming the context data would re-render on every keystroke. We don’t want that!
React context API - Take away:
- Only some of the state data in your application need to be placed in the context. Keep the local state where it is required, and only place the truly global state in the context.
- The context may not be suitable for apps with frequent state changes if you want to avoid unnecessary component re-rendering. There are external libraries like
[use-context-selector](https://github.com/dai-shi/use-context-selector)to manage and handle unnecessary re-rendering. - The context API is ideal for low-frequency state updates and when prop drilling becomes a problem. That is when we are passing down props into many deeply nested components.
- Consider a proper state manager whenever you want standard or when you work with high-velocity data in a more extensive application. These libraries, by default, ensure only the component that explicitly references a particular state is updated.
In the next lesson, we will discuss state management using the Zustand state manager library.
Final project source code.
Next part: Managing React State With Zustand
continue