
February 13, 2023
. 11 min readReact Hooks: Managing State and Side-Effects
This React Hooks tutorial covers what you need to know to use Hooks in your project. Learn how we have used it to manage state and component logic, including side effects.

As briefly mentioned in the last lesson, React Hooks lets us use state and other React features in function components. So far, in our todos project, we are rendering the UI with the todos data that we assigned to a variable like so:
const todos = [
  // ...
];
The todos data, as we’ve learned, will change over time. We'll declare a state to hold the data while tending to modify it.
This React tutorial is part 3 of 17 in the React for beginners series.
- Part 1 – React Tutorial: A Comprehensive Guide for Beginners
- Part 2 – React Components and Data Model
- Part 4 – Build React Form With This Best Practice
- Part 5 – Raising and Handling Events in React
- Part 6 – React Developer Tools: Debug and optimize React apps
- Part 7 – CSS in React: Styling React Components
- Part 8 – React Todos App: Add Editing functionality
- Part 9 – Profiling: Optimizing Performance in React
- Part 10 – Using LocalStorage with React
- Part 11 – How to Use React Icons
- Part 12 – React Context API: Managing Application State
- Part 13 – Zustand Tutorial: Managing React State
- Part 14 – React Router: The Beginners Guide
- Part 15 – React children props: What Is It?
- Part 16 – React Toggle Button: Let’s Switch Navigation Widget
- Part 17 – Deploy React App With Vercel
In this part of the series, we'll discuss managing state and using other React features in a function component. We will learn React Hooks by creating a “dropdown menu” project. Once we understand how React Hooks work, we can then implement Hooks in our primary project.
React useState() Hook
The useState() is one of the Hooks that comes bundled with React. This Hook lets us add a state in a function component. It takes an initial state argument and returns an array of two items.
Let’s see how it works. You can follow along with the project source code available on CodeSandbox.
We start by creating a Navbar component, and then import React useState() Hook and log it:
import { useState } from "react";

const Navbar = () => {
  console.log(useState(false));
  return (
    <nav>
      nav bar content
    </nav>
  );
};
export default Navbar;
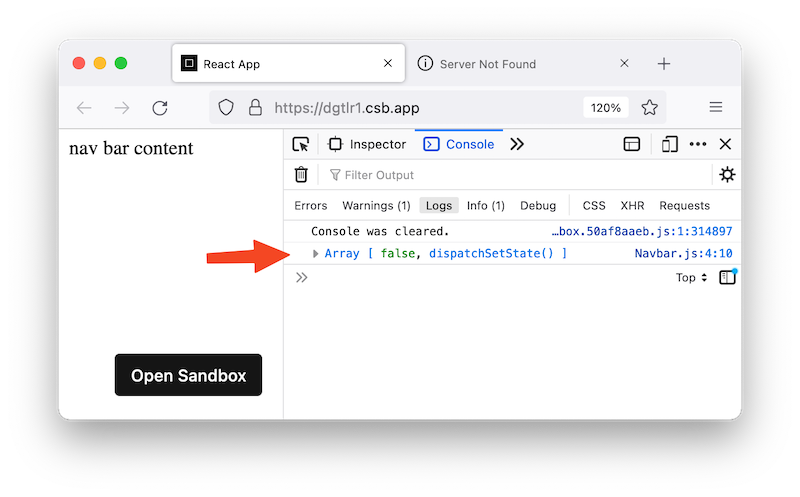
If we save the file and see the console, we'll see the returned state value:

The React useState() Hook returns an array of items. The first item is the initial state that we passed to the Hook. In the example, a boolean value of false. The item can also be a value of other data types like string, array, number, or object. The second item returned by the Hook is a function that allows us to update the state.
Using array destructuring syntax, we can grab the items from the Hook like so:
const [dropdown, setDropdown] = useState(false);
We’ve named a state variable called dropdown to hold the state value and a function named setDropdown to update the state. We can name these items whatever we want.
Rules for Using Hooks
To use a React Hook, we must ensure they are only called at the top level of a functional component or from a custom Hook. Not inside a loop, condition, or regular function.
This ensures that the component logic is visible to React and is called in the same order on every render, thus, letting React know how to preserve the state of the Hooks between multiple calls correctly.
The rule is automatically enforced in a
create-react-appsetup. For other setups, we can include an ESLint plugin called eslint-plugin-react-hooks.
Why Was the Component Invoked Twice?
As seen in the image above, the returned value of the Hook gets printed twice. Let's briefly discuss the component's lifecycle to understand why that happens.
Component Lifecycle
Every React component we create will go through a series of phases: mounting phase, updating, and unmounting.
The mounting phase is when React component mounts (i.e., created and inserted) the DOM. After that, the component may update when a state or props changes. Finally, the component unmounts or is removed from the DOM.
This cycle should render a component one time. If we temporarily remove the <StrictMode> that wraps the root component in the entry file. In my case src/index.js file:
root.render(
  // <StrictMode>
    <Navbar />
  // </StrictMode>
);
And then, save and reload the page; we'll see that the component will render just one time:
When React version 18 was released, it introduced a mechanism called “concurrent rendering and reusable state.” React was preparing a situation whereby a component state can be restored when it is temporarily unmounted. This implies that a part of the UI can be removed and reinstated without losing the previous state.
To prepare developers for the feature, React added a check to the Strict Mode to simulate the behavior in development. It does this by unmounting the component after the initial mount and then remounting it to restore the state from the initial mount. The idea was to improve the performance of React applications.
Let’s ensure we return the
<StrictMode>back in our code and save the file.
root.render(
  <React.StrictMode>
    <TodoApp />
  </React.StrictMode>
);
Building a React Dropdown System
A dropdown can hide or display a panel due to the user’s interaction. A system like this requires a state to remember the preceding event to toggle the panel.
The Dropdown Markup
Like the HTML dropdown, the Navbar component below renders a simple dropdown markup:
const Navbar = () => {
return (
<nav>
<ul>
<li>Home</li>
<li>About</li>
<li>
<button>
Services <span>↓</span>
</button>
<ul>
<li>Design</li>
<li>Development</li>
</ul>
</li>
</ul>
</nav>
);
};
export default Navbar;
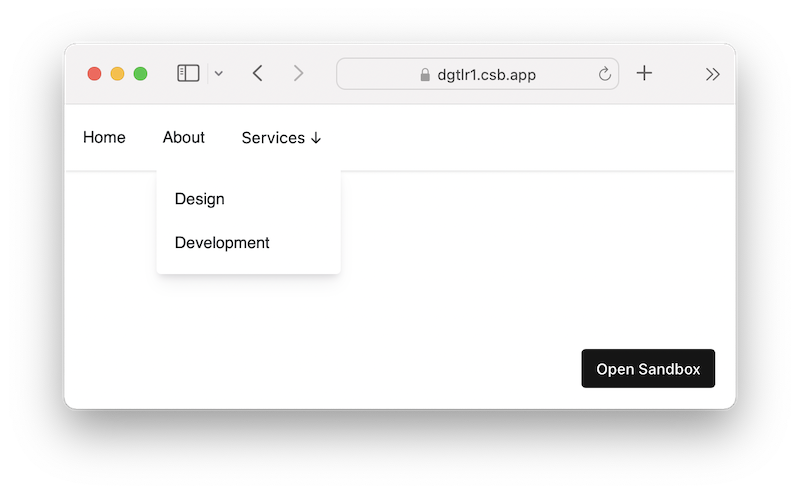
The rendered output looks like the image below. Let’s ignore the styles and focus on the logic. We will cover CSS in a later lesson.
Toggling the Dropdown Panel
To toggle the dropdown, we’ll add a state above the return statement:
import { useState } from "react";
const Navbar = () => {
  const [dropdown, setDropdown] = useState(false);
  return (
    // ...
  );
};
export default Navbar;
We declared a state with an initial value of false. This initial state value lets us hide the dropdown panel when the component initially renders.
Updating the State
To show the dropdown, we will listen to a click event on the “Services” menu item and then update the state value. To do this, we will use the updater function, setDropdown, i.e., the second item in the array.
import { useState } from "react";
const Navbar = () => {
const [dropdown, setDropdown] = useState(false);
return (
<nav>
<ul>
{/* other items here*/}
<li>
<button onClick={() => setDropdown((prev) => !prev)}>
Services <span>↓</span>
</button>
{dropdown && (
<ul>
<li>Design</li>
<li>Development</li>
</ul>
)}
</li>
{/* ... */}
When the dropdown button is clicked, the setDropdown function is called with a callback that takes the current boolean value and returns an inverted value. So on every click, the state boolean value toggles between false and true. We then used the dropdown variable, which holds the current state value, to hide/show the panel:
{dropdown && (
  // ...
)}
The dropdown toggle will also work if we modify the onClick event to the following:
<button onClick={() => setDropdown(!dropdown)}>
However, whenever the updated state depends on the previous state, it is a good practice to compute it by accessing the previous state in a callback, as we did earlier.
See the demo below:
See source code on CodeSandbox.
Now that we know how the React useState() Hook works, using it throughout the course should make more sense.
React useEffect() Hook
The useEffect(), as the name implies, lets us perform side effects in function components.
If we take a step back to the basic, functional programming taught us to construct programs by writing pure functions. These functions should receive an argument, compute an output based on it, and not affect anything outside themselves.
This makes functions reusable; thus, React embraces the concept of functional programming in its implementation. While we might not know, we have been using this concept in this React series. We have created components that receive props from their parents and rendered the JSX based on the props. These types of components are called pure components.
However, components can make computations that modify some states outside their scope. These computations are side effects and are unavoidable when building React applications. Examples include DOM manipulation, subscriptions, and data fetching.
Let’s see a quick example. The component below modifies the document title to show the state of the dropdown menu:
import { useState } from "react";

const Navbar = () => {
  const [dropdown, setDropdown] = useState(false);
  document.title = `Current state value: ${dropdown}`;
  return (
    // ...
  );
};
export default Navbar;
This action is a side effect because it modifies the window's title bar that does not belong to the component. The implementation, however, makes the component impure. React deals with this situation by providing a Hook called useEffect to isolate any side effects from the rendering logic.
If we implement this Hook in the above code, it will look like so:
import { useState, useEffect } from "react";

const Navbar = () => {
  const [dropdown, setDropdown] = useState(false);
  useEffect(() => {
    document.title = `Current state value: ${dropdown}`;
  }, [dropdown]);
  return (
    // ...
  );
};
export default Navbar;
We imported the React useEffect Hook in the code and placed the side effects inside it. The useEffect Hook takes a function as an argument and an optional array of dependencies that define when to re-run the effect.
Naturally, the effect runs after every completed render. That is, on the first component render and after it detects a state or prop changes in the dependency array. If we leave the dependency array empty, React will skip any form of re-rendering and only execute the effects once.
useEffect(() => {
  // effect here
}, []);
However, we must only empty the array if the effect does not use values from the rendered scope. In other words, the effect doesn’t use values inside the component. If the effect use component values like props, state, or even functions, we must include them as dependencies in the array.
Important
Applying the React useEffect() Hook
Let’s apply this Hook in our dropdown project, so it makes more sense.
Detecting a Click Outside a DOM Node
When we open a dropdown, we should be able to close it when we click outside it for a positive user experience.
We will define a logic that watches for clicks outside the dropdown panel by registering an event listener in the useEffect Hook. But before that, we must access the DOM node of the dropdown using another Hook.
React useRef() Hook
The useRef() is another built-in Hook that lets us access DOM elements. Knowing this element will allow us to define logic to detect its surrounding DOM nodes.
In our dropdown project, we will import the useRef Hook and pass a reference object, ref, to the target DOM node:
import { useState, useRef } from "react";
const Navbar = () => {
const [dropdown, setDropdown] = useState(false);
const ref = useRef();
console.log(ref);
return (
// ...
<li ref={ref}>
<button onClick={() => setDropdown((prev) => !prev)}>
Services <span>↓</span>
</button>
{dropdown && (
<ul>
<li>Design</li>
<li>Development</li>
</ul>
)}
</li>
We logged the ref object in the code to see the target node and other useful properties.
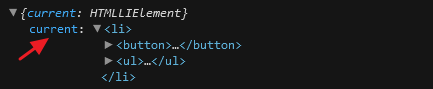
As seen above, the target node is available on the .current property.
Now we can define the logic that watches for clicks outside of the DOM node in the useEffect Hook:
import { useState, useEffect, useRef } from "react";
const Navbar = () => {
  const [dropdown, setDropdown] = useState(false);
  const ref = useRef();

  useEffect(() => {
    const handler = (event) => {
      if (dropdown && ref.current && !ref.current.contains(event.target)) {
        setDropdown(false);
      }
    };
    document.addEventListener("mousedown", handler);
  }, [dropdown]);

  return (
    // ...
  );
};
export default Navbar;
In the Hook, we checked if the dropdown panel is opened and if the DOM node that is being clicked is not within the dropdown. Then we reset the state value to false to close the dropdown.
As we can see in the Gif, the dropdown panel closes when we click outside of it.
Cleaning up Side Effects
Some side effects require a clean-up to prevent a memory leak. For instance, adding an event listener requires removing it when the component unmounts. Some other examples include canceling network requests and invalidating timers.
The useEffect Hook, as we mentioned earlier, runs on the first render and after it detects changes in the dependencies. It lets us clean effects from the previous render before another cycle and just before the components unmount.
Back to our dropdown project, we can tell React to remove an event listener that we previously registered by returning a cleanup function inside the useEffect:
useEffect(() => {
  // side effect
  return () => {
    // Cleanup the event listener
    document.removeEventListener("mousedown", handler);
  };
}, [dropdown]);
React will run the function when it is time to perform the cleanup. See the updated source code on CodeSandbox.
Other great articles here
Creating a React Custom Hook
In the Navbar component, we defined a logic that watches for clicks outside the dropdown panel to close it. Imagine we create another component like Modal or Popover to use similar logic.
Instead of duplicating the logic to use in the new component, we can extract the common logic into a reusable function. Here, we will create a React custom Hooks that watches for clicks outside the DOM to reuse in multiple places.
We’ll start by creating a src/useOnClickOutside.js file and adding the following code:
import { useEffect } from "react";
export const useOnClickOutside = (ref, currentState, updater) => {
  useEffect(() => {
    const handler = (event) => {
      if (currentState && ref.current && !ref.current.contains(event.target)) {
        updater();
      }
    };
    document.addEventListener("mousedown", handler);
    return () => {
      // Cleanup the event listener
      document.removeEventListener("mousedown", handler);
    };
  }, [ref, currentState, updater]);
};
If we take a closer look at the code, most is a copy/paste of the logic from the Navbar component. We exported a custom Hook called useOnClickOutside that expects three arguments required by the side effects: reference, current state, and updater function.
The custom Hook can be named whatever we want. But we must start with
useso that React can apply Hooks' rules.
Using the custom Hook
In the Navbar component, we can replace the “outside click” logic with the custom Hook like so:
import { useState, useRef } from "react";
import { useOnClickOutside } from "./useOnClickOutside";
const Navbar = () => {
  const [dropdown, setDropdown] = useState(false);
  const ref = useRef();

  useOnClickOutside(ref, dropdown, () => setDropdown(false));
  return (
    // ...
  );
};
export default Navbar;
In the code, we imported the custom Hook and passed the ref, the state, and the updater function. If we save all files, the navigation dropdown should still work.
Re-using the custom Hook
Now that we have a custom Hook that we can reuse, let’s apply it to another component. The following code creates a simple Modal component using the useOnClickOutside Hook:
import { useState, useRef } from "react";
import { useOnClickOutside } from "./useOnClickOutside";
const Modal = () => {
  const [openModal, setOpenModal] = useState(false);
  const ref = useRef();

  useOnClickOutside(ref, openModal, () => setOpenModal(false));
  return (
    <div className="modal">
      <button onClick={() => setOpenModal(true)}>Modal</button>
      {openModal && (
        <div ref={ref} className="modalContent">
          <span onClick={() => setOpenModal(false)}>X</span>
          <div>Modal content here</div>
        </div>
      )}
    </div>
  );
};
export default Modal;
The implementation is similar to that of the Navbar component.
As we can see, extracting similar logic into a custom Hook has helped simplify our code. The below GIF demonstrates the result:
By clicking outside of the modal and the dropdown, we were able to close the panels. See the complete source code on CodeSandbox.
Now, we know how to use some useful React Hooks. We will use them later in a future lesson. Before we continue with the primary project, let’s talk about how React handles form elements in the next lesson.
Next part: Build React Form With This Best Practice
continue