
February 13, 2023
. 4 min readProfiling: Optimizing Performance in React
This tutorial will show you how to use the React Profiler to profile and optimize your React components.

Earlier in the series, we introduced the React Developer Tools and referenced a detailed article that discusses optimization in a React application.
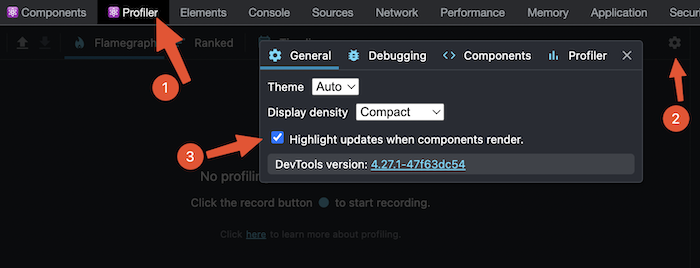
In this lesson, we’ll focus on the React DevTools Profiler to measure the performance of our todos application. Let’s visit the Profiler tab and activate the settings that notify us about a rendering component.
This lesson uses the Chrome React DevTools.
This React tutorial is part 9 of 17 in the React for beginners series.
- Part 1 – React Tutorial: A Comprehensive Guide for Beginners
- Part 2 – React Components and Data Model
- Part 3 – React Hooks: Managing State and Side-Effects
- Part 4 – Build React Form With This Best Practice
- Part 5 – Raising and Handling Events in React
- Part 6 – React Developer Tools: Debug and optimize React apps
- Part 7 – CSS in React: Styling React Components
- Part 8 – React Todos App: Add Editing functionality
- Part 10 – Using LocalStorage with React
- Part 11 – How to Use React Icons
- Part 12 – React Context API: Managing Application State
- Part 13 – Zustand Tutorial: Managing React State
- Part 14 – React Router: The Beginners Guide
- Part 15 – React children props: What Is It?
- Part 16 – React Toggle Button: Let’s Switch Navigation Widget
- Part 17 – Deploy React App With Vercel
We can start profiling our React application by clicking on the record button in the Profile tab and then interacting with the app:
When we interacted with the app, we saw the components that re-rendered. If we investigate the flame chart, we’ll also see why components are re-rendering and how long it took.
With the result, we can see where the bottlenecks are and then provide the necessary optimization.
In the GIF above, we can see how editing the individual todo item kept re-rendering the entire app on every keystroke. That action can cause performance issues if we have a complex computation in one of the components. In that case, re-rendering such components on every keystroke can cause lagging in the text field.
We want the application to only re-render when we hit the enter key after editing and not during the editing.
The re-rendering is happening because we were editing the parent state directly in the
onChangeevent:
<input
  type="text"
  value={itemProp.title}
  onChange={(e) => setUpdate(e.target.value, itemProp.id)}
  // ...
/>
With that, on every keystroke, the parent component would re-render. And as we’ve learned in the series, when a parent component re-renders, its children also re-render.
Fixing unnecessary re-rendering
We can fix this unnecessary re-rendering in different ways.
Using Prop as an Initial State
Instead of assigning the title from the parent directly to the value attribute, we will initialize an internal state with the value. Then, use that state value instead of calling itemProp.title directly in the JSX:
const TodoItem = ({ itemProp, handleChange, delTodo, setUpdate }) => {
  const [updateInput, setUpdateInput] = useState(itemProp.title);
  //...
  return (
    <li className={styles.item}>
      <div className={styles.content} style={viewMode}>
        {/* ... */}
        <span style={itemProp.completed ? completedStyle : null}>
          {updateInput}
        </span>
      </div>
      <input
        type="text"
        value={updateInput}
        className={styles.textInput}
        style={editMode}
        onChange={(e) => setUpdateInput(e.target.value)}
        onKeyDown={handleUpdatedDone}
      />
    </li>
  );
};
export default TodoItem;
In the onChange event, we update the internal state on every keystroke, not the parent state.
Finally, in the handler that handles re-submission, we will now send the edited todo to the parent state to update the UI:
const handleUpdatedDone = (event) => {
  if (event.key === 'Enter') {
    setUpdate(updateInput, itemProp.id);
    setEditing(false);
  }
};
Now, when we edit a todo, only the component gets updated:
That is a performance improvement!
Knowing When to Use Prop as an Initial State Value
It is considered anti-pattern to pass a prop as a value of a component state “if” we expect the state value to change when the prop changes. Due to the nature of the useState Hook, the initial value of the Hook will discard on re-renders. That means useState cannot capture further changes whenever the prop value (that we assigned as the initial value) changes.
However, in our case, we ONLY need the prop to initialize the internal state once; it doesn’t change, which is perfectly fine in this scenario. The TodoItem component now handles the state update that affects the user interface.
const TodoItem = ({ itemProp, handleChange, delTodo, setUpdate }) => {
  const [updateInput, setUpdateInput] = useState(itemProp.title);
  //   ...
};
Using Uncontrolled Input With useRef Hook
Uncontrolled input is efficient and a better way to manage unnecessary re-rendering. When we change the value of a ref input, it doesn’t cause a re-render. This can further improve React performance.
So let’s convert the controlled input to an uncontrolled input. We will start by removing the state from the TodoItem component:
// const [updateInput, setUpdateInput] = useState(itemProp.title);
Then, revert the updateInput in the JSX back to the title from the parent state, itemProp.title:
return (
  <li className={styles.item}>
    <div className={styles.content} style={viewMode}>
      {/* ... */}
      <span style={itemProp.completed ? completedStyle : null}>
        {itemProp.title}
      </span>
    </div>
    <input
      type="text"
      // value={updateInput}
      className={styles.textInput}
      style={editMode}
      // onChange={(e) => setUpdateInput(e.target.value)}
      onKeyDown={handleUpdatedDone}
    />
  </li>
);
Notice we also removed the value and the onChange attributes from the input element.
Creating a Reference
The following code imports useRef from react and creates an instance from it. After that, we assign the reference to the ref attribute of the edit input:
import { useState, useRef } from 'react';
// imports
const TodoItem = ({ itemProp, handleChange, delTodo, setUpdate }) => {
  const editInputRef = useRef(null);
  // ...
  const handleUpdatedDone = (event) => {
    if (event.key === 'Enter') {
      setUpdate(editInputRef.current.value, itemProp.id);
      setEditing(false);
    }
  };
  return (
    <li className={styles.item}>
      {/* ... */}
      <input
        type="text"
        ref={editInputRef}
        defaultValue={itemProp.title}
        className={styles.textInput}
        style={editMode}
        onKeyDown={handleUpdatedDone}
      />
    </li>
  );
};
export default TodoItem;
In the code, we also assigned the title from the parent state to the defaultValue attribute. Finally, in the handleUpdatedDone, we are sending the reference value to update the title in the parent state. If we now edit a todo, no re-render will happen:
As shown in the GIF above, editing the todo entry does not trigger a re-render. Cool!
Next, we will discuss how to persist the state data in the browser storage, so the entries are available on page refresh and subsequent visits.
Next part: Using LocalStorage with React
continue