
February 13, 2023
. 14 min readReact Tutorial: A Comprehensive Guide for Beginners
Learn React and start building web applications with this tutorial. This lesson is for beginners and covers the fundamental concepts.

Do you want to learn React and build web applications from zero to deployment? Then, this course is for you!
This React tutorial will help beginners understand React concepts and how to implement them to build a performant React application.
Learning React is an excellent choice for a present-day developer. Many startups and corporate firms embraced the technology directly or indirectly through frameworks like Next.js, Gatsby, etc., for building high-performance, scalable, and maintainable web applications.
Why You Should Take This Course
Below are some of the reasons you should learn React:
- You’ll get to build your ideal application within a short period. React has a shorter learning curve compared to many other frameworks/ libraries.
- React has a large and incredible community. You’ll hardly get stuck on a problem without finding a mature solution.
- You can easily transition to building native apps with React native if you want to develop mobile applications.
- React is famous and in demand.
Prerequisites
To follow this course, we expect you to be familiar with the following topics:
- HTML and CSS
- JavaScript fundamentals like the object, arrays, conditionals, and so on
- JavaScript ES6 features like the arrow functions, object destructuring, etc.
In case you are still struggling with JavaScript, do not worry! You can read and code along as we write our React applications. We will use the plainest language possible to explain every code.
At the end of this React tutorial course, we will have the following react projects in our toolbox:
- Primary project: a todos application (see demo)
- Dropdown menu and Modal (see demo)
- React form (see demo)
For this course, we aim to cover React to length. So, we have divided the journey into series:
This React tutorial is part 1 of 17 in the React for beginners series.
- Part 2 – React Components and Data Model
- Part 3 – React Hooks: Managing State and Side-Effects
- Part 4 – Build React Form With This Best Practice
- Part 5 – Raising and Handling Events in React
- Part 6 – React Developer Tools: Debug and optimize React apps
- Part 7 – CSS in React: Styling React Components
- Part 8 – React Todos App: Add Editing functionality
- Part 9 – Profiling: Optimizing Performance in React
- Part 10 – Using LocalStorage with React
- Part 11 – How to Use React Icons
- Part 12 – React Context API: Managing Application State
- Part 13 – Zustand Tutorial: Managing React State
- Part 14 – React Router: The Beginners Guide
- Part 15 – React children props: What Is It?
- Part 16 – React Toggle Button: Let’s Switch Navigation Widget
- Part 17 – Deploy React App With Vercel
Now, we can get started!
What is React?
React (sometimes called React js) is a JavaScript library that originated at Facebook for building interactive user interfaces or UIs. It lets developers create sizeable web apps or complex UIs by integrating a small, isolated code snippet.
React js, in some quarters, is often called a framework because of its behavior and capabilities to build full-fledged applications. However, it is technically a library; it requires more libraries to form complex solutions. For instance, we will need additional libraries to solve standard application requirements like routing, data fetching, etc. On the other hand, JavaScript frameworks like AngularJS, Vue.js, and Ember.js comes bundled with nearly everything to build a complete application.
Declarative Programming and React
Coming from vanilla JavaScript, giving an HTML div container like so:
<body>
  <div id="root"></div>
</body>
We can render a paragraph in the div by writing the following code in a script file:
const root = document.getElementById('root');
const paragraph = document.createElement('p');
const paragraphContent = document.createTextNode("I'm a paragraph!");
paragraph.appendChild(paragraphContent);
root.appendChild(paragraph);
In the code above, we were saying:
- Get the
divelement with rootid. - Create a
pelement. - Create a text node for the
pelement. - Add the text to the
pelement - Finally, add the
pelement in thediv.
When we provide step-by-step instructions to the compiler on how to perform a task (in our case, updating the UI), we use the imperative programming style. However, React lets us declaratively describe what we want instead of providing the steps, and it will figure out how to do the task for us.
Since we are only concerned about rendering the p element, all we need to do is to render something like this:
<p>I'm a paragraph!</p>
A declarative approach will help speed up the development process because we’ll not write code instructions telling the compiler how it should perform tasks.
Thinking in React Component
To build applications with React, we think of the user interface as a bunch of encapsulated, isolated, and reusable code snippets called components.
For now, think component as a simple function that we can call with some input and render some output
As we can reuse functions, we can also reuse components, merge them and create a complex user interface. Let’s take a look at the UI of our primary project:
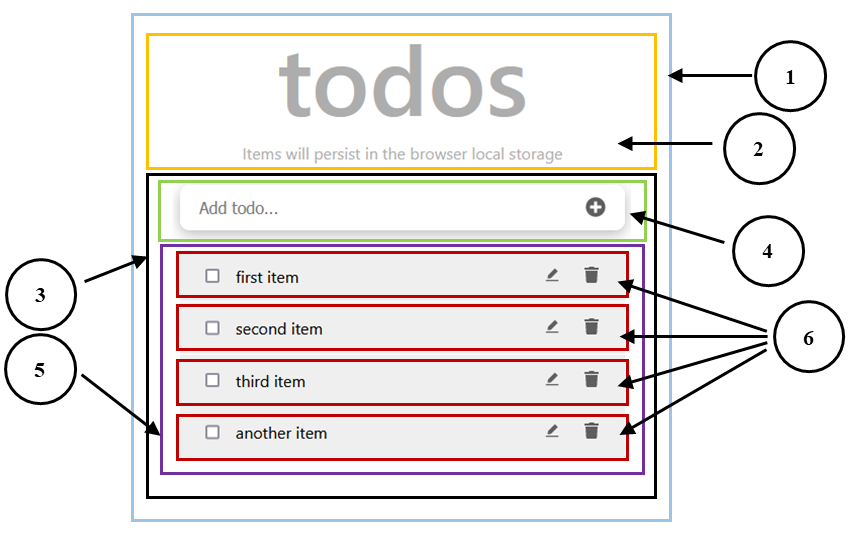
To build this application or any other app with React (even as complex as Twitter), we will start by breaking down the user interface into smaller and encapsulated units, as outlined in the image.
Each of these units is a component tasked to do one thing. In the image, we have labeled the components to correspond to the following component names:
- TodoApp: the parent or root component. It holds two direct child components.
- Header: display the todos heading text.
- TodosLogic: contains the application logic. It includes two direct child components.
- InputTodo: will take the user’s input.
- TodosList: serves as a container for the todos items.
- TodoItem: renders the individual todos item.
As we can see, we have six components that form the user interface. If any components become complex, we can further decompose them into smaller ones. For instance, we may decompose the TodoItem into smaller components: one holding the checkbox, another holding the text of the todo, and the last containing the edit and delete button.
This modularity helps ensure we build an application that is flexible and maintainable.
Later in the course, we will add more components when we start with multipage routing. Till then, we will work with the components mentioned above.
The React Virtual DOM
When we build web applications, we often perform operations that manipulate the browser's DOM. For instance, with the DOM APIs, we can add or remove page elements, modify their appearance, and perform actions on the elements.
These DOM operations are lighter and very fast. However, when the state of the UI changes, it triggers a re-rendering which can be expensive!
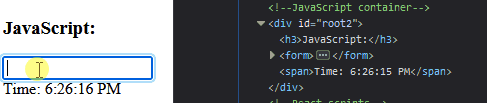
The following code simulates a re-rendering page with JavaScript:
const update = () => {
  //   JavaScript
  const element2 = `
    <h3>JavaScript:</h3>
    <form>
      <input type="text"/>
    </form>
    <span>Time: ${new Date().toLocaleTimeString()}</span>
  `;
  document.querySelector('#root2').innerHTML = element2;
};

setInterval(update, 1000);
The setInterval() callback lets us trigger a simulated re-render of the user interface after every second. As we can see below, the DOM elements repaint on every update. The text input field also loses its state due to this re-rendering:
You can see the demo on Codepen.
The re-rendering behavior in the GIF above calls for optimization. Different JavaScript frameworks have their respective solutions and strategies to optimize re-rendering. For React, the team deploys the concept of virtual DOM.
Exploring the React Virtual DOM
As the name implies, virtual DOM is a “virtual” representation of the actual DOM. It is an object that React uses to replicate the real DOM to optimize re-rendering efficiently.
React deploys the concept of virtual DOM because it conforms with its declarative approach that lets us write more predictable code. With virtual DOM, we do not need to bother about state transitions. Once the state of the UI is updated, React ensures only the affected node(s) get updated in the actual DOM.
How React Implements Virtual DOM
When we render the UI of a React application, a virtual DOM tree representing that UI is created and kept in memory. On the next update, React will create a new virtual DOM tree and compare it to the previous snapshot using a diffing algorithm to detect necessary changes. This process is called reconciliation.
After that, React will use a renderer library to update the rendered application. This library will ensure the real DOM only receives and repaints the updated node or nodes.
Adding React to HTML Page
Let’s see how React handles re-rendering compared to the vanilla JavaScript example above. We'll add React to a section of an HTML page.
The HTML code below includes a div container element to hold React content and two scripts pointing to the React CDN.
<body>
  <h1>React in HTML</h1>
  <!--  React container  -->
  <div id="root1"></div>

  <!-- React scripts -->
  <script
    src="https://unpkg.com/react@18/umd/react.development.js"
    crossorigin
  ></script>
  <script
    src="https://unpkg.com/react-dom@18/umd/react-dom.development.js"
    crossorigin
  ></script>
  <!-- load script file. -->
  <script src="script.js"></script>
</body>
Next, in a script file, we’ll add the following React js code:
const rootElement = document.querySelector('#root1');
const root = ReactDOM.createRoot(rootElement);

const update = () => {
  const element1 = React.createElement(
    'div',
    null,
    React.createElement(
      'form',
      null,
      React.createElement('input', {
        type: 'text',
      })
    ),
    React.createElement(
      'span',
      null,
      'Time: ',
      new Date().toLocaleTimeString()
    )
  );
  root.render(element1);
};

setInterval(update, 1000);
Let’s ignore most parts of the update function; we will discuss it in a moment. In the other parts of the code, we accessed a DOM element that we included in the HTML file and then created a React application with it:
const rootElement = document.querySelector('#root1');
const root = ReactDOM.createRoot(rootElement);
React uses the ReactDOM to ensure the real DOM only receives and repaints what is necessary. We then rendered the content assigned to element1 inside the DOM:
root.render(element1);
The content that we rendered is called React elements. They describe what we see on the screen. If we log the React element in the browser console:
let element1 = React.createElement(
 // ...
);
console.log(element1)
We will get an object representing the virtual DOM:
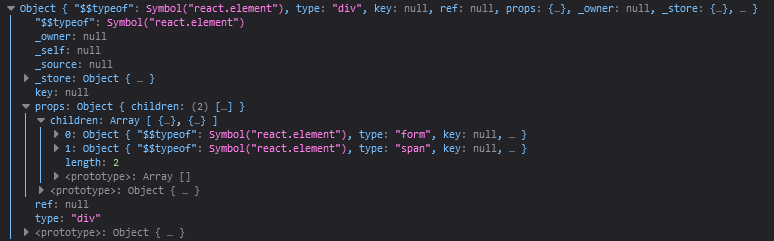
React creates this object whenever we render the React elements and keep it somewhere in the memory. React will also create a new virtual DOM tree if changes occur in the render and compare it with the previous snapshot to figure out what has changed.
React can do this quickly because the virtual DOM (being an object representing the UI) is very cheap to create and doesn't draw the user interface, unlike the actual DOM. After React finalizes the necessary update, it ensures the real DOM receives and repaints the updated node.
The GIF below demonstrates the behavior:
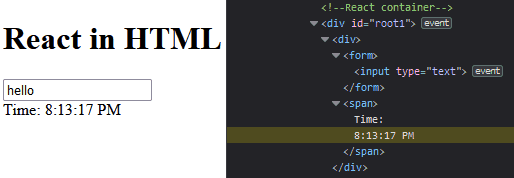
As we can see, only the rendered time whose state changes gets repainted on every re-render. Likewise, we are not losing the input value when a state change occurs in the UI. See the code and demo on Codepen.
You can read more on Virtual DOM in this article.
React Element and JSX
Earlier, we saw how we rendered React elements to describe the user interface. With that React syntax, we can complete a React application. However, React provides a more straightforward way to describe the user interface.
If we take a look at the HTML DOM structure in the GIF above, we have something like this:
<div>
  <form>
    <input type="text" />
  </form>
  <span>Time: ##:##:## PM</span>
</div>
If we copy and paste the code in a Babel repl editor, we will get the equivalent React elements that we used earlier:

Using Babel, we can transform the code on the editor's left to the one React understands on the right. Since the code on the left looks more straightforward and familiar, React allows us to build the UI using that syntax instead of writing the complex React elements.
If we update the React code example in the previous section with the familiar syntax, we will have the following:
let element1 = (
  <div>
    <form>
      <input type="text" />
    </form>
    <span>Time: {new Date().toLocaleTimeString()}</span>
  </div>
);
And the application would also work.
Now, why are we replacing JavaScript/React code with HTML? You may ask! Well, in React, the code above is not HTML but JSX.
What is JSX?
Writing JavaScript/React code to describe the UI is not simple, as we’ve seen above. This makes the React author create what looks like a JavaScript version of HTML called JSX or JavaScript XML.
JSX is a syntax extension for JavaScript that provides an easier way to describe the user interface. Under the hood, the JSX is translated to a regular JavaScript version at runtime since browsers cannot read it. Throughout the React js tutorial series, we will use JSX to describe the project's UI.
A few notes about the JSX:
- We can write a valid JavaScript expression inside the JSX via the curly braces,
{}. - Element’s attributes and event handlers are always in camel cases. A few exceptions are
aria-*anddata-*attributes which must be in lowercase.
Setting up the Working Environment
We’ve covered how to quickly interact with React by writing React code in an HTML file. In this section, we will prepare our development environment for production-worthy applications. We will set up development environments using a toolchain like create-react-app CLI, build tools like Vite, and also cover how to set up projects from scratch.
The create-react-app CLI
The create-react-app CLI comes bundled with what an average developer would need to bootstrap a React application. It will include React and other third-party libraries we will need, including Webpack, and Babel, which lets us use JSX and modern JavaScript features.
To install the CLI, we must have Node installed on our machine to access the NPM (Node Package Manager) tool.
Run
node -vandnpm -vin the terminal to see if you have node and npm installed, respectively. Ensure you have node>=14.0.0 and npm>=5.6
If you don’t have them installed, head to Node to download and install the latest stable version.
Next, cd into a directory to save the project. For instance, cd Desktop and run:
npx create-react-app react-todo-app
This command creates a react-todo-app project folder and includes all the starter files. Let's open the folder with a code editor:
cd react-todo-app
code .
For this project, we are using Visual Studio Code. You can use your favorite code editor.
We will see a file structure that looks like so:
react-todo-app
    ├── node_modules
    ├── public
    │    ├── favicon.ico
    │    ├── index.html
    │    ├── logo192.png
    │    ├── logo512.png
    │    ├── manifest.json
    │    └── robots.txt
    ├── src
    │    ├── App.css
    │    ├── App.js
    │    ├── App.test.js
    │    ├── index.css
    │    ├── index.js
    │    ├── logo.svg
    │    ├── reportWebVitals.js
    │    └── setupTest.js
    ├── .gitignore
    ├── package-lock.json
    ├── package.json
    └── README.md
Inside the Project Folder
The node_modules contains the files of the project’s dependencies. This includes react and other third-party libraries. The public folder contains the public asset of our application; it is where the static files reside. The index.html in the public folder holds a div container element where our application will appear.
The src folder contains the working files. The index.js file in the src directory will serve as the entry point to our application.
Let’s ignore the other files in the src folder; we will write everything from scratch. The .gitignore file lists the directories and files to ignore when we commit to a repository. The ReadME.md file is intended to provide instructions about the project. Lastly, package.json contains meta-information about the project. It also includes a list of project dependencies and helpful script commands.
Running the Development Server
If we open the package.json file and look for the scripts property, we will see a list of script commands:
"scripts": {
  "start": "react-scripts start",
  "build": "react-scripts build",
  "test": "react-scripts test",
  "eject": "react-scripts eject"
},
We use the npm run #### command to run any scripts, where #### is the script name. We can ignore the run in the command for start and test scripts.
To start the development server, we will run the following:
npm run start
#or
npm start
The application should launch automatically in the browser window on port 3000. If nothing happens, visit localhost:3000 in the browser address bar to see the default app.

We can stop the development server with Ctrl + c.
Working Environment With Vite
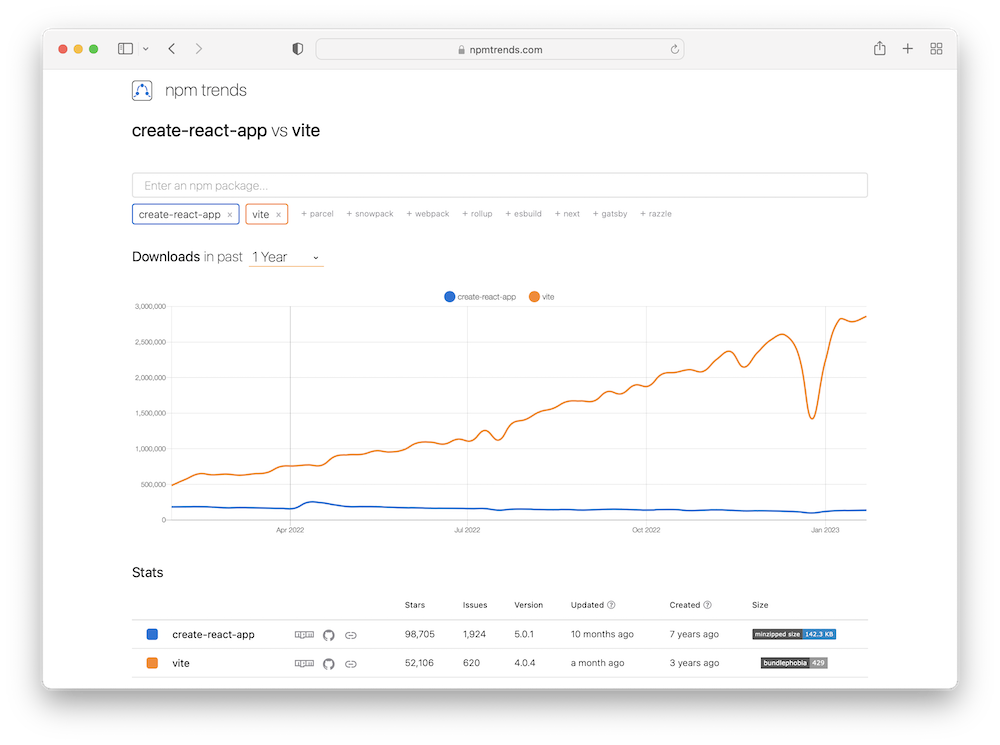
Vite is a build tool that we can use to set up React projects. It provides faster installation and instant server start times compared to the create-react-app CLI. This makes it a go-to solution for most developers when creating a React project. See the npm trends against create-react-app:
Let’s set it up.
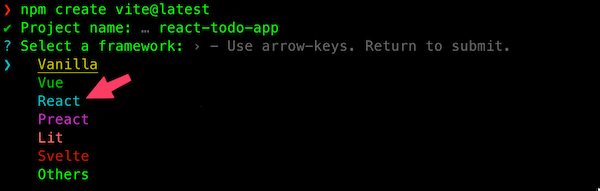
From the terminal, let’s run the following command and follow the prompt:
npm create vite@latest
We’ll enter a project name (for instance, react-todo-app) and then select React from the list of frameworks:
We’ll be prompted to select a variant between JavaScript and TypeScript. We’ll choose JavaScript.
Once that is done, let’s cd into the project folder and run npm install to install the necessary dependencies in the local node_modules folder.
cd react-todo-app
npm install
Let’s open the project with a code editor:
code .
Then, open the package.json file to see the following scripts:
"scripts": {
  "dev": "vite",
  "build": "vite build",
  "preview": "vite preview"
},
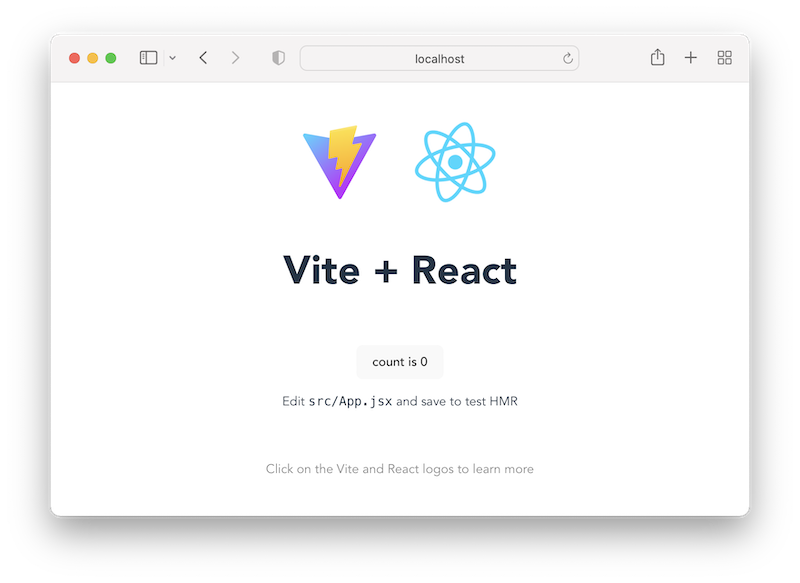
As we learned earlier, we can start the development server (in this case) by running npm run dev. The application should start automatically in the browser window on an available port. If nothing happens, check the terminal and visit the URL printed in it:
Create React App vs. Vite: Comparing the Folder Structure
Like the CRA, the src folder inside a Vite project also contains the working files. However, while the CRA uses the index.js file as the entry point, Vite uses main.jsx.
On the file extension, CRA is lenient as it allows both .js and .jsx files to write React JSX code. But Vite requires .jsx files by default for JSX code. In this course, we will use Vite to create our projects. However, you can follow along using your preferred solution.
Enjoy reading this post?
Setting up React Environment From Scratch
Building React applications without using tools like Vite and CRA requires extra effort. We will install and configure a couple of libraries that the tools installed for us behind the scene.
Though most of the time, we'll start a React project using either a create-react-app CLI, Vite, or some other solutions. However, sometimes our project might require a minimal setup, of which some of the available tools might include things we probably don’t need.
The create-react-app, for instance, adds a lot of abstraction and makes it difficult to add a custom build configuration without ejecting the application. So, for this reason, it is wise to know how to set up a project for flexibility. Let’s do that!
Creating a Folder and Initialise a Project
Create a project folder, cd into it, and open it with the code editor:
mkdir react-project-no-cra
cd react-project-no-cra
code .
After that, run npm init -y to generate a package.json file. This lets us add scripts and keep track of the project dependencies.
Installing Dependencies
We’ll start by installing two fundamental React dependencies: react, which is the actual library, and react-dom, which lets us use React with the DOM.
npm install react react-dom
Next, we need a bundler like Webpack to bundle our codes and their dependencies and a compiler like Babel to transform our code to what all browsers understand. We will install both packages and their related dependencies as dev dependencies.
Starting with Webpack, let’s run this command:
npm install --save-dev webpack webpack-cli webpack-dev-server
Then, let’s add babel also:
npm install --save-dev @babel/core babel-loader @babel/preset-react @babel/preset-env
Next, we will install a plugin to assist with adding Webpack bundles file to HTML file:
npm install --save-dev html-webpack-plugin
Configuring Webpack
Since the goals in development differ from that of production, Webpack lets us create configuration files that target the different environments and another file to maintain a common configuration. That means we will create three files in the project root: webpack.common.js, webpack.dev.js, and webpack.prod.js.
In the webpack.common.js, let’s add the common configuration:
const path = require('path');
const HTMLWebpackPlugin = require('html-webpack-plugin');
module.exports = {
  entry: './src/index.js',
  output: {
    path: path.join(__dirname, 'dist'),
    filename: 'bundle.js',
    clean: true,
  },
  plugins: [
    new HTMLWebpackPlugin({
      template: './src/index.html',
    }),
  ],
  module: {
    rules: [
      {
        test: /\.(js|jsx)$/,
        exclude: /node_modules/,
        use: [{ loader: 'babel-loader' }],
      },
    ],
  },
};
To include the common configuration in the environment-specific configurations (i.e., development and production), we will install a util called webpack-merge.
npm install --save-dev webpack-merge
Now open the webpack.dev.js file, and add dev-specific configuration:
const { merge } = require('webpack-merge');
const common = require('./webpack.common.js');
module.exports = merge(common, {
  mode: 'development',
  devtool: 'inline-source-map',
  devServer: {
    static: './dist',
    port: 3001,
    open: true,
    hot: true,
    compress: true,
  },
});
Then, add the following in the webpack.prod.js file:
const { merge } = require('webpack-merge');
const common = require('./webpack.common.js');
module.exports = merge(common, {
  mode: 'production',
  devtool: 'source-map',
});
Save all files.
In the module.exports object of the webpack.common.js file, we specified an entry option to tell Webpack where to look to start building the bundle. So let’s create a src/index.js file in our project root; we will add code to the file later. The output object is where we tell Webpack to output the bundled files.
The HTMLWebpackPlugin lets us use a custom HTML template where it will inject all necessary bundled files for us. Let’s create a src/index.html and add the following:
<!DOCTYPE html>
<html lang="en">
  <head>
    <meta charset="UTF-8" />
    <meta http-equiv="X-UA-Compatible" content="IE=edge" />
    <meta
      name="viewport"
      content="width=device-width, initial-scale=1.0"
    />
    <title>React application</title>
  </head>
  <body>
    <div id="root"></div>
  </body>
</html>
The focus here is the root div container. Similar to how we write React in HTML earlier, we will access this DOM element to display our application.
The module.rules in the config file let us set rules for modules. There, we tell Webpack to use babel-loader to transpile JavaScript files. In addition, we need to provide further instructions to the Babel loader to perform the task.
Let’s create a babel config file called .babelrc in the project root and add the following code:
{
  "presets": [
    "@babel/preset-env",
    ["@babel/preset-react", {
      "runtime" : "automatic"
    }]
  ]
}
Now, Webpack is configured to run a React application.
Defining Scripts
Next, we will modify our scripts in the package.json file to use the config files. Let’s update the scripts so we have the following:
"scripts": {
  "start": "webpack serve --config webpack.dev.js",
  "build": "webpack --config webpack.prod.js"
},
Save the file.
Rendering React Code
Before we run the scripts, let’s open the src/index.js file and add the following code:
import React from 'react';
import ReactDOM from 'react-dom/client';

const rootElement = document.getElementById('root');

const root = ReactDOM.createRoot(rootElement);
root.render(<h1>Hello from React application</h1>);
Similar to how we rendered React elements in the HTML file earlier, the above code renders a simple JSX element in the root container. Here, we imported React and ReactDOM instead of loading them from their respective CDN.
The
importstatement is an ES6 feature that allows us to bring inReactandReactDOMobjects from their respective modules.
If we save all files and run npm start, the project should start automatically in the browser window on the specified port, 3001.

If we try the npm run build command, a production-ready dist folder will be generated in the project root.
Handling Other Files
In our module.rules, we only added rules for JavaScript/JSX files. Let’s tell Webpack how to handle other file types.
Asset files:
If we add an src/images/react.svg file, and then import it to render an image so the src/index.js look like so:
// ...
import reactLogo from './images/react.svg';
root.render(
  <div>
    <h1>Hello from React application</h1>
    <img src={reactLogo} className="logo react" alt="React logo" />
  </div>
);
We will get an error if we start the server.
We need to update the module.rules in the webpack.common.js to include the asset resource type:
module: {
  rules: [
    // ...
    {
      test: /\.(png|svg|jpg|gif)$/i,
      type: 'asset/resource',
    },
  ],
},
And then, update the output object to include assetModuleFilename:
output: {
  // ...
  assetModuleFilename: 'images/\[name\][ext][query]',
},
CSS files:
If we add a src/styles/app.css file and include a CSS rule like so:
body {
  color: #ff2778;
}
After that, import the CSS file in the src/index.js file:
import './styles/app.css';
We will get an error if we run the dev server. Here also, we need to inform Webpack of the type of loaders to use to transform CSS files. So let’s install the following:
npm install --save-dev mini-css-extract-plugin css-loader
In the webpack.common.js file, import MiniCssExtractPlugin at the top like so:
const MiniCssExtractPlugin = require('mini-css-extract-plugin');
After that, add the plugin in the plugins array:
plugins: [
  // ...
  new MiniCssExtractPlugin({
    filename: 'styles.css',
  }),
],
Then, update the module.rules to use the loaders like so:
module: {
  rules: [
    // ...
    {
      test: /\.css$/,
      use: [MiniCssExtractPlugin.loader, 'css-loader'],
    },
  ],
},
If we save all files and test our work, it should work!

Great job!
As we can see, setting up the development environment from scratch can be overwhelming. Though, this should be a one-time setup you can reuse for other React projects. You can find the source code on this GitHub repository.
Again, often, we will use either the
create-react-appcommand or Vite or a React-based framework to kickstart a new React project.
That is it for the first lesson.
We’ve laid the foundations for building a fantastic React application and becoming a React developer. Hopefully, you’ve learned something new about React. It is worth saying that this is only a teaser of what we covered in the React series.
In the next part, you will learn about React components and data models and start implementing them to build React projects.
Enjoy reading this post?
Next part: React Components and Data Model
continue