
February 20, 2023
. 7 min readWhat is a virtual DOM in React?
The virtual DOM provides a mechanism that abstracts manual DOM manipulations away from the developer, helping us to write more predictable code

This post was originally witten for LogRocket
The virtual DOM is a fundamental React concept. You have probably heard of it if you have ever written React code. However, you may not understand how it works and why React uses it.
In this article, we’ll cover what the virtual DOM is, exploring its benefits in React and reviewing a practical example. Let’s get started!
What is the React DOM?
To understand the virtual DOM and learn why React implements it, let’s first refresh our knowledge of what the actual browser DOM is.
Normally, whenever a user requests a webpage, the browser receives an HTML document for that page from the server. The browser then constructs a logical, tree-like structure from the HTML to show the user the requested page in the client.
This tree-like structure is called the Document Object Model, also known as the DOM. It is a structural representation of the web document as nodes and objects, in this case, an HTML document.
The DOM serves as an interface for the web document so that JavaScript and other scripting languages can access, manipulate, and programmatically interact with the document’s content. For example, developers can use DOM APIs to add or remove elements, modify their appearance, and perform user actions on web elements.
How re-rendering impacts performance
DOM operations are very fast, light operations. However, when the app data changes and triggers an update, re-rendering can be expensive.
Let’s simulate re-rendering a page with the JavaScript code below:
const update = () => {
  const element = `
    <h3>JavaScript:</h3>
    <form>
     <input type="text"/>
    </form>
    <span>Time: ${new Date().toLocaleTimeString()}</span>
  `;
  document.getElementById("root1").innerHTML = element;
};

setInterval(update, 1000);
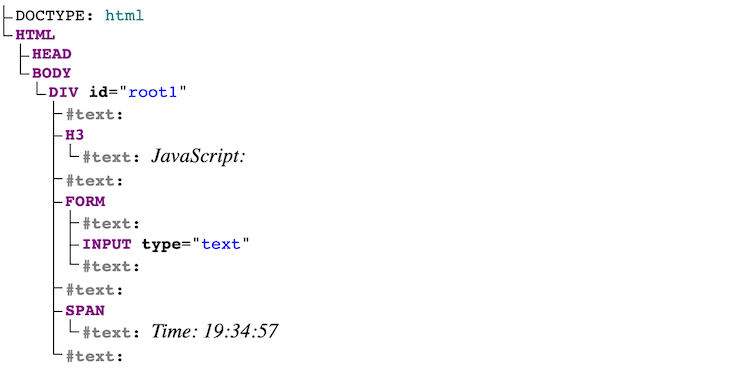
You can find the complete code on CodeSandbox. The DOM tree representing the document looks like the following:
The setInterval() callback in the code lets us trigger a simulated re-render of the UI after every second. As seen in the GIF below, the document DOM elements are rebuilt and repainted on each update. The text input in the UI also loses its state due to this re-rendering:

As seen above, the text field loses the input value when an update occurs in the UI, which calls for optimization.
Different JavaScript frameworks offer different solutions and strategies to optimize re-rendering. However, React implements the concept of the virtual DOM.
Exploring the React virtual DOM
As the name implies, virtual DOM is a “virtual” representation of the actual DOM. By virtual, we mean a much lighter replica of the actual DOM — in the form of objects — that can be saved in the browser memory.
How is the virtual DOM different from the real DOM?
A common misconception is that the virtual DOM is faster than or rivals the actual DOM. That is not correct! In fact, the virtual DOM’s operations support or add to those of the actual DOM. It provides a mechanism that lets the actual DOM computes minimal DOM operation when re-rendering the UI.
React deploys the concept of virtual DOM in the rendering process because it conforms with its declarative approach.
This approach lets us specify what state we want the UI to be in, after which React makes it happen. It abstracts manual DOM manipulations away from the developer, helping us write more predictable, unruffled code, so we can focus on creating components.
The virtual DOM allows developers to not worry about state transitions. Once we update the state, React ensures the DOM matches that state.
For instance, in our last example, on every re-render, React will ensure only the time gets updated in the actual DOM. This way, we won’t lose the value of the input field while the UI update happens.
The virtual DOM object
Let’s take a look at the following render code representing the React version of the previous JavaScript example:
// ...
const update = () => {
  const element = (
    <>
      <h3>React:</h3>
      <form>
        <input type="text" />
      </form>
      <span>Time: {new Date().toLocaleTimeString()}</span>
    </>
  );
  root.render(element);
};
For brevity, we have removed some of the code. You can see the complete code on CodeSandbox.
We can also write the JSX elements in plain React, like so:
const element = React.createElement(
   React.Fragment,
   null,
   React.createElement("h3", null, "React:"),
   React.createElement(
    "form",
     null,
    React.createElement("input", {
     type: "text"
    })
   ),
   React.createElement("span", null, "Time: ", new Date().toLocaleTimeString())
);
Keep in mind that you can get the React equivalent of JSX code by pasting the JSX elements in a babel repl editor.
Now, if we log the React element in the console:
const element = (
  <>
    <h3>React:</h3>
    <form>
      <input type="text" />
    </form>
    <span>Time: {new Date().toLocaleTimeString()}</span>
  </>
);
console.log(element)
We will have something like this:
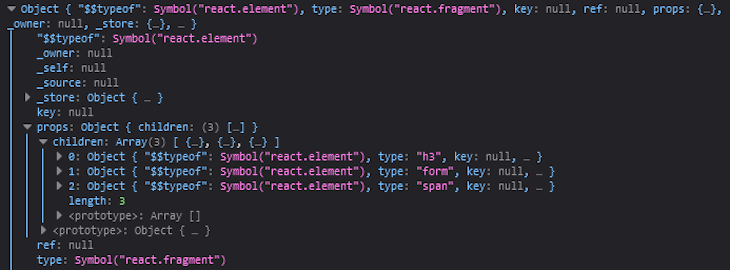
The object, as seen above, is the virtual DOM. It represents the user interface.
How React implements the virtual DOM
To understand the virtual DOM strategy, we need to understand the two major phases that are involved, rendering and reconciliation.
When we render an application user interface, React creates a virtual DOM tree representing that UI and stores it in memory. On the next update, or in other words, when the data that renders the app changes, React will automatically create a new virtual DOM tree for the update.
To further explain this, we can visually represent the virtual DOM as follows:
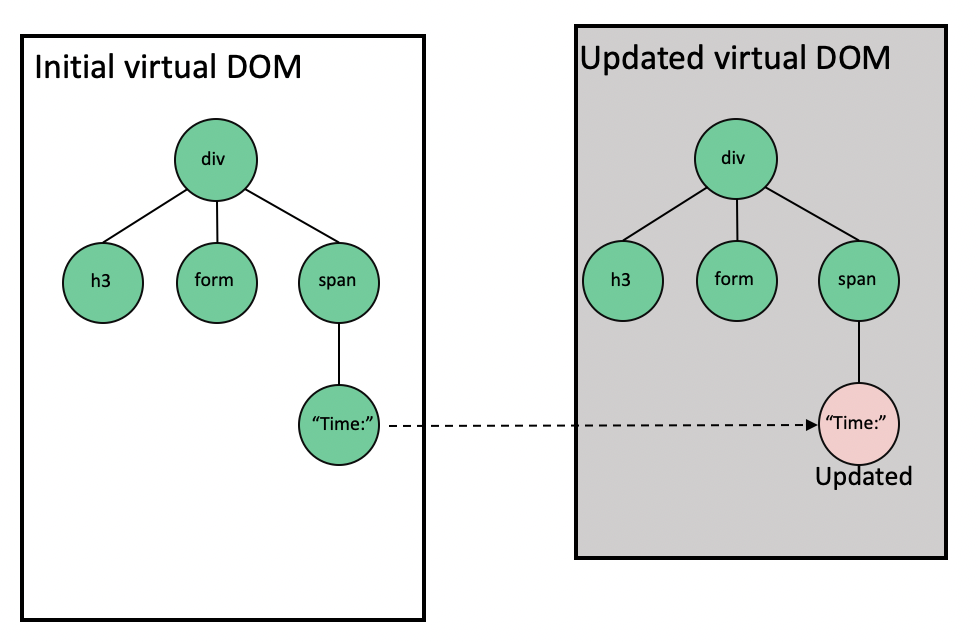
The image on the left is the initial render. As the Time changes, React creates a new tree with the updated node, as seen on the right side.
Remember, the virtual DOM is just an object representing the UI, so nothing gets drawn on the screen.
After React creates the new virtual DOM tree, it compares it to the previous snapshot using a diffing algorithm to figure out and compute what changes are necessary. This process is called reconciliation.
After the reconciliation process, React then uses a renderer library like ReactDOM which takes the diffs information to update the rendered app. This library ensures the actual DOM only receives and repaints the updated node or nodes.
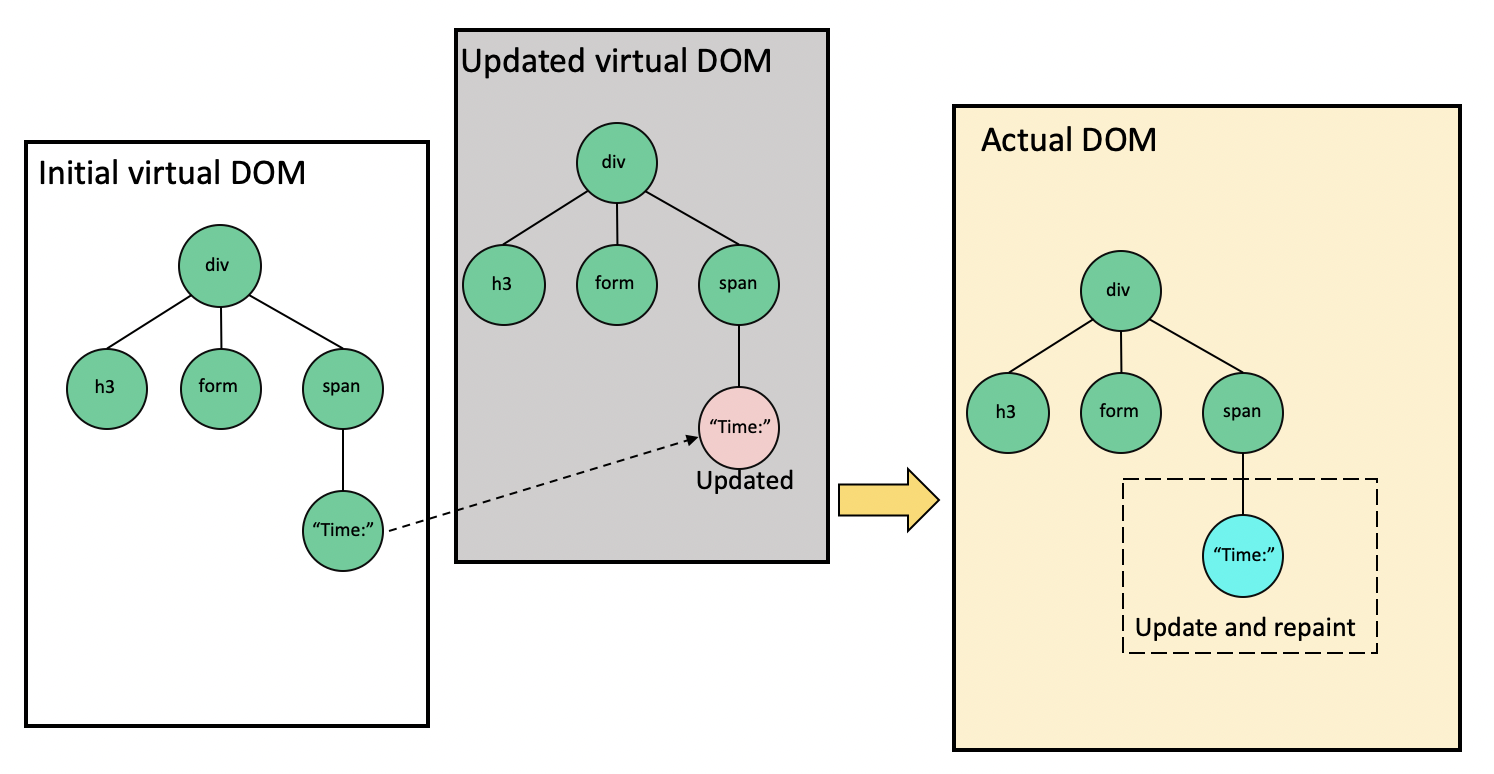
As seen in the image above, only the node whose data changes gets repainted in the actual DOM. The GIF below further prove this statement:
When a state change occurs in the UI, we’re not losing the input value.
In summary, on every render, React has a virtual DOM tree it compares with the previous version to determine what node content gets updated and ensure the updated node matches up with the actual DOM.
The React diffing process
When React diffs two virtual DOM trees, it begins by comparing whether or not both snapshots have the same root element. If they have the same elements, like in our case, where the updated nodes are of the same span element type, React moves on and recurses on the attributes.
In both snapshots, no attribute is present or updated on the span element. React then repeats the procedure on the children. Upon seeing that the Time text node has changed, React will only update the actual node in the real DOM.
On the other hand, if both snapshots have different element types, which is rare in most updates, React will destroy the old DOM nodes and build a new one. For instance, going from span to div, as shown in the respective code snippets below:
<span>Time: 04:36:35</span>
<div>Time: 04:36:38</div>
In the following example, we render a simple React component that updates the component state after a button click:
import { useState } from "react";

  const App = () => {
    const [open, setOpen] = useState(false);

    return (
      <div className="App">
       <button onClick={() => setOpen((prev) => !prev)}>toggle</button>
       <div className={open ? "open" : "close"}>
        I'm {open ? "opened" : "closed"}
       </div>
      </div>
    );
  };
export default App;
Updating the component state re-renders the component. However, as shown below, on every re-render, React knows only to update the class name and the text that changed. This update will not hurt unaffected elements in the render:
See the code and demo on CodeSandbox.
How React diffs lists
When we modify a list of items, how React diffs the list depends on whether the items are added at the beginning or the end of the list. Consider the following list:
<ul>
    <li>item 3</li>
    <li>item 4</li>
    <li>item 5</li>
</ul>
On the next update, let’s append an item 6 at the end, like so:
<ul>
    <li>item 3</li>
    <li>item 4</li>
    <li>item 5</li>
    <li>item 6</li>
</ul>
React compares the items from the top. It matches the first, second, and third items, and knows only to insert the last item. This computation is straightforward for React.
However, let’s insert item 2 at the beginning, as follows:
<ul>
    <li>item 2</li>
    <li>item 3</li>
    <li>item 4</li>
    <li>item 5</li>
</ul>
Similarly, React compares from the top, and immediately realizes that item 3 doesn’t match item 2 of the updated tree. It therefore sees the list as an entirely new one that needs to be rebuilt.
Instead of rebuilding the entire list, we want the DOM to compute minimal operations by only prepending item 2. React lets us add a key prop to uniquely identify the items, like so:
<ul>
    <li key="3">item 3</li>
    <li key="4">item 4</li>
    <li key="5">item 5</li>
</ul>

<ul>
    <li key="2">item 2</li>
    <li key="3">item 3</li>
    <li key="4">item 4</li>
    <li key="5">item 5</li>
    <li key="6">item 6</li>
</ul>
With the implementation above, React would know that we have prepended item 2 and appended item 6. As a result, it would work to preserve the items that are already available and add only the new items in the DOM.
If we omit the key prop whenever we map to render a list of items, React is kind enough to alert us in the browser console.
How the virtual DOM is different from the shadow DOM
Before we wrap up, here’s a question that often comes up. Is the shadow DOM the same as the virtual DOM? The short answer is that their behavior is different.
The shadow DOM is a tool for implementing web components. Take, for instance, the HTML input element range:
<input type="range" />
That gives us this result:

If we inspect the element using the browser’s developer tools, we’ll see only a simple input element. However, internally, browsers encapsulate and hide other elements and styles that make up the input slider.
Using Chrome DevTools, we can enable the Show user agent shadow DOM option from Settings to see the shadow DOM:
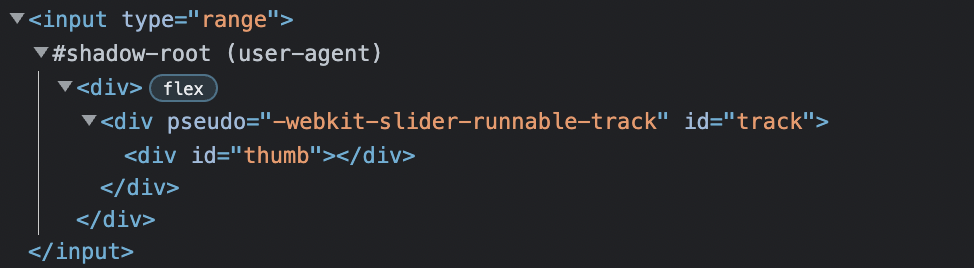
In the image above, the structured tree of elements from the #shadow-root inside the input element is called the shadow DOM tree. It provides a way to isolate components, including styles from the actual DOM.
Therefore, we’re sure that a widget or component’s style, like the input range above, is preserved no matter where it is rendered. In other words, their behavior or appearance is never affected by other elements’ styles from the real DOM.
Conclusion
React uses the virtual DOM as a strategy to compute minimal DOM operations when re-rendering the UI. It is not in rivalry or faster than the DOM!
The virtual DOM provides a mechanism that abstracts manual DOM manipulations away from the developer, making us write more predictable code. It does this by comparing two render trees to know what exactly has changed and only updates what is necessary on the actual DOM.
Like React, Vue and some other frameworks also employ this strategy. However, the Svelte framework proposes another approach to ensuring an application is optimized. It instead compiles all components into independent and tiny JavaScript modules, making the script very light and fast to run.
I hope you enjoyed reading this article. Share your thoughts in the comment section if you have questions or contributions.